
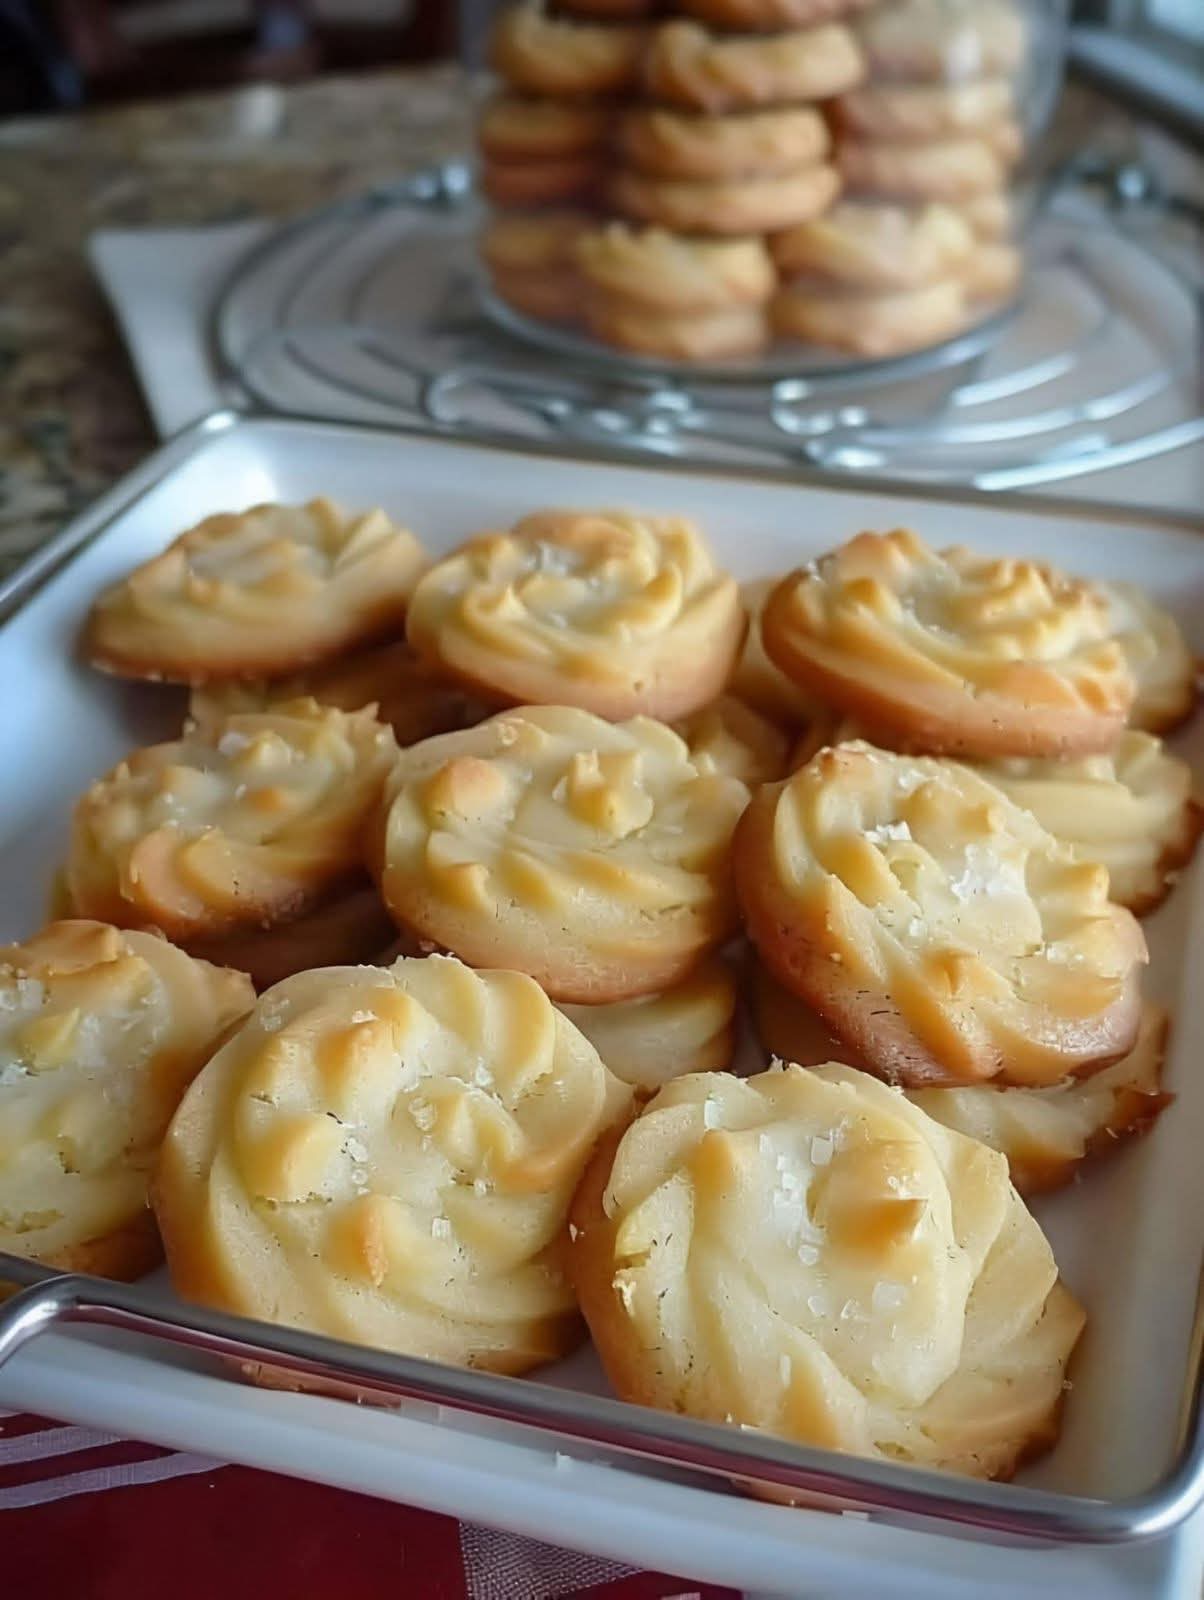
There’s a magic in simplicity. In a world of towering layer cakes and decadent, complex desserts, sometimes the greatest joy comes from the humble, perfect bite of a classic. Enter what I confidently call the World’s Best Butter Cookies. This isn’t hyperbole; this is a fact verified by buttery, tender crumbles, a delicate sweetness, and a rich, melt-in-your-mouth texture that is utterly irresistible.
This easy cookie recipe is your new secret weapon. It’s the quintessential classic dessert that belongs on every holiday baking tray, yet is sublime enough for a simple Tuesday afternoon tea. With just six pantry staples, you can create a cookie that feels both elegantly traditional and blissfully homemade. Whether you’re a baking for beginners or a seasoned pro, this recipe is a masterclass in how quality ingredients and proper technique create perfection.
So, preheat your oven and prepare your favorite baking sheets. We’re about to bake the only butter cookie recipe you’ll ever need.
Why This Truly Is the World’s Best Butter Cookie Recipe
Before we dive into the ingredients, let’s talk about what sets this recipe apart. The title “World’s Best” is earned through a flawless balance:
· The Texture: It achieves the holy grail of butter cookies: crisp at the edges, tender and slightly crumbly (or “short”) in the center, thanks to the high fat content and the use of an egg yolk.
· The Flavor: Pure, unadulterated butter is the star. It’s rich and toasty, complemented by just the right amount of sweetness and a warm hint of vanilla. There’s no baking powder or soda to mask the flavor—just pure, simple goodness.
· The Versatility: This dough is a blank canvas. As written, it’s sublime. But it can also be transformed with citrus zest, spices, dipped in chocolate, or sprinkled with sanding sugar for any occasion, making it a perfect make-ahead cookie dough for holiday cookie swaps.
The Ingredients: A Closer Look at Quality
The secret to these easy homemade cookies lies in the quality and treatment of its few ingredients. Let’s break down why each one is non-negotiable.
Unsalted Butter (8 oz / 2 sticks / 226g): This is the soul of the cookie. Use a high-fat, European-style butter (like Kerrygold or Plugrá) if possible. The higher butterfat content (82-83% vs. 80% in standard American butter) yields a richer flavor and more tender crumb. It must be at room temperature—pliable but not greasy or melted. This allows it to properly cream with the sugar, trapping air for the perfect texture.
Granulated Sugar (3/4 cup / 150g): We use granulated sugar for a slight crispness. For an even more delicate texture, you can substitute up to 1/4 cup with confectioners’ sugar.
Salt (1/4 tsp): A critical flavor enhancer. It balances the sweetness and makes the buttery flavor pop. If you only have salted butter, simply omit the added salt.
Pure Vanilla Extract (1 1/2 tsp): Opt for the real thing. The warm, complex notes of pure vanilla are worth the investment. For variation, try vanilla bean paste for those beautiful speckles.
Large Egg Yolk (1): The yolk adds richness, tenderness, and helps bind the dough without making it tough. It contributes to the beautiful golden color and soft structure. Save the white for a healthy breakfast scramble or a quick meringue cookie!
All-Purpose Flour (2 cups / 240g): The structure-builder. For consistent results, I recommend weighing your flour. If measuring by volume, use the “spoon and level” method: spoon flour into your measuring cup and level it off with a knife. Don’t scoop directly from the bag, as this packs in too much flour and leads to dry cookies.
Essential Tools:
· Stand mixer or hand mixer: For perfect creaming.
· Rimmed baking sheets: Lined with parchment paper or a Silpat baking mat for easy cleanup and even browning.
· Cooling rack: Essential for letting cookies cool properly and stay crisp.
Step-by-Step Instructions for Foolproof Butter Cookies
Follow these steps carefully, and you will achieve bakery-quality results right in your own kitchen.
Step 1: Creaming the Butter & Sugar (The Most Important Step)
In the bowl of your stand mixer fitted with the paddle attachment (or using a hand mixer), beat the room-temperature butter, sugar, and salt on medium speed for a full 2-3 minutes. Stop and scrape down the bowl once. You want the mixture to become very pale, fluffy, and almost whipped. This step incorporates air, which is your primary leavening agent.
Step 2: Incorporating the Wet Ingredients
Add the vanilla extract and the egg yolk. Mix on medium-low until fully combined, about 30 seconds. Scrape the bowl again to ensure everything is homogeneous.
Step 3: Adding the Flour
With the mixer on low speed, gradually add the all-purpose flour. Mix just until the flour is incorporated and no dry streaks remain. Do not overmix! Overworking the dough develops gluten, which leads to tough cookies.
Step 4: Shaping the Dough
Here’s where you choose your cookie style—a key part of this easy cookie recipe’s charm.
· For Slice-and-Bake Cookies: Divide the dough in half. Shape each half into a log about 1.5 to 2 inches in diameter on a piece of parchment or plastic wrap. Roll tightly, twist the ends, and refrigerate for at least 2 hours (or up to 3 days). This is a fantastic make-ahead cookie dough for busy weeks.
· For Rolled & Cut Cookies: Flatten the dough into a disc, wrap in plastic, and chill for at least 1 hour. This firms up the butter, making it easier to roll out without sticking. Roll on a lightly floured surface to about 1/4-inch thickness and use your favorite cookie cutters.
· For Piped Spritz Cookies: If your dough is soft and you have a cookie press, you can pipe shapes directly onto a baking sheet. If the dough is too soft to hold shape, chill for 20-30 minutes first.
Step 5: Baking to Perfection
Preheat your oven to 350°F (175°C). This ensures a consistent temperature for even baking.
Line your baking sheets with parchment paper.
Arrange your shaped cookies about 1 inch apart. They spread only slightly.
Bake for 10-13 minutes. The cookies are done when the edges are just beginning to turn a light, golden brown. The centers will still look soft but set.
Crucial Step: Let the cookies cool on the baking sheet for 5 minutes before transferring them to a wire cooling rack to cool completely. They will continue to set as they cool.
Pro Tips & Troubleshooting for Baking Success
· Chill Your Dough: If your dough feels greasy or too soft at any point, chill it. This prevents cookies from spreading into puddles. Cold butter in the oven creates steam pockets, leading to a tender, flaky texture.
· Weigh Your Ingredients: For the most consistent, professional results, a digital kitchen scale is the best investment a baker can make.
· One Sheet at a Time: Bake in the center of the oven for even heat circulation. If you must bake two sheets, rotate them front-to-back and top-to-bottom halfway through baking.
· My Cookies Are Too Hard: The dough was likely overmixed, or the cookies were overbaked. Next time, mix just until combined and pull them out as soon as the edges blush with gold.
· My Cookies Spread Too Much: Your butter was likely too warm, or your dough wasn’t chilled sufficiently. Ensure your butter is room temp, not warm.
Endless Variations: Make This Recipe Your Own
This classic dessert base is a dream to customize. Here are some popular holiday baking and everyday twists:
· Citrus Zest: Add 1 tbsp of lemon, orange, or lime zest to the butter-sugar mixture for a bright, fresh flavor.
· Spiced: Add 1 tsp of ground cinnamon, cardamom, or a pinch of nutmeg to the flour.
· Chocolate-Dipped: Melt high-quality dark chocolate or white chocolate chips and dip half of each cooled cookie. Sprinkle with sea salt or chopped nuts before the chocolate sets.
· Sandies Style: Roll the dough logs in finely chopped pecans or walnuts before slicing and baking.
· Thumbprint Cookies: After baking, press the back of a measuring spoon into the warm cookie to make an indentation. Fill with raspberry jam, lemon curd, or chocolate hazelnut spread.
· Holiday Fun: Before baking, sprinkle with colorful sanding sugar or nonpareils. Use festive cookie cutters for Christmas, Easter, or Halloween shapes.
Storage & Gifting: Keeping Your Cookies Perfect
· Storage: Keep cooled cookies in an airtight container at room temperature for up to 1 week. They freeze beautifully for up to 3 months.
· Freezing Dough: Both shaped logs and dough discs wrap well and can be frozen for up to 3 months. Thaw in the refrigerator before slicing or rolling.
· Gifting: These cookies make a heartfelt DIY kitchen gift. Pack them in a decorative tin or box lined with parchment. They are perfect for holiday cookie swaps, teacher gifts, or neighborly kindness.
Frequently Asked Questions (FAQ)
Q: Can I use salted butter?
A:Yes. Simply omit the 1/4 teaspoon of salt called for in the recipe.
Q: Why did my cookies come out flat and greasy?
A:This is almost always due to butter that was too warm or dough that wasn’t chilled. Ensure your butter is cool to the touch (around 65°F) and chill your shaped dough thoroughly before baking.
Q: Can I make these without a mixer?
A:Absolutely! Use a sturdy wooden spoon and some elbow grease to cream the butter and sugar until very light and fluffy. It will take a few minutes of vigorous mixing.
Q: How do I get my slice-and-bake cookies to be perfectly round?
A:After forming the log, roll it back and forth on the counter a few times to smooth it out. For truly perfect rounds, chill the log for 30 minutes, then roll it again—the firming butter will help hold a perfect cylinder shape.
Q: Are these the same as shortbread cookies?
A:They are very close cousins! Traditional shortbread often has a higher butter-to-flour ratio and sometimes omits the egg yolk and vanilla. This recipe is a slightly enriched, more tender version, but they share the same delicate, buttery soul.
Q: What’s the best way to decorate these for a holiday cookie platter?
A:A simple drizzle of white chocolate or a dusting of powdered sugar is elegant. For more color, use a royal icing to pipe simple designs, or roll the edges in festive sprinkles before baking.
The Final Word on Simplicity
In the end, the “World’s Best” title isn’t just about taste—it’s about the experience. It’s about the joy of creating something profoundly delicious from a handful of simple ingredients. It’s about the scent of brown butter and vanilla filling your kitchen, a scent that feels like home. It’s about sharing a plate of these golden, delicate cookies and watching faces light up with that first, perfect bite.
This easy cookie recipe is more than instructions; it’s a reliable friend for your holiday baking, a quick project for a sweet craving, and a testament to the timeless power of butter, sugar, and flour. Print it, bookmark it, and get ready to claim it as your own.
Now, I’d love to hear from you! Have you tried this recipe? What variations did you create? Share your experiences and photos in the comments below. And if you loved this guide to the World’s Best Butter Cookies, please share it with a fellow baker! Happy baking
More Recipes You Might Like
-
Crock Pot Chicken And Noodles Belongs
The Ultimate Comfort: Why 4-Ingredient Crock Pot Chicken And Noodles Belongs in Your Weekly Rotation There is a specific, almost…
-
Carrot Cake Roll with Cream Cheese Frosting
The Swirl of Perfection: Why Carrot Cake Roll with Cream Cheese Frosting Is the Dessert That Steals the Show There…
-
LOADED CHEESY POCKET TACOS
The Handheld Fiesta: Why Loaded Cheesy Pocket Tacos Are the Dinner Revolution You Need There is a specific, almost primal…