
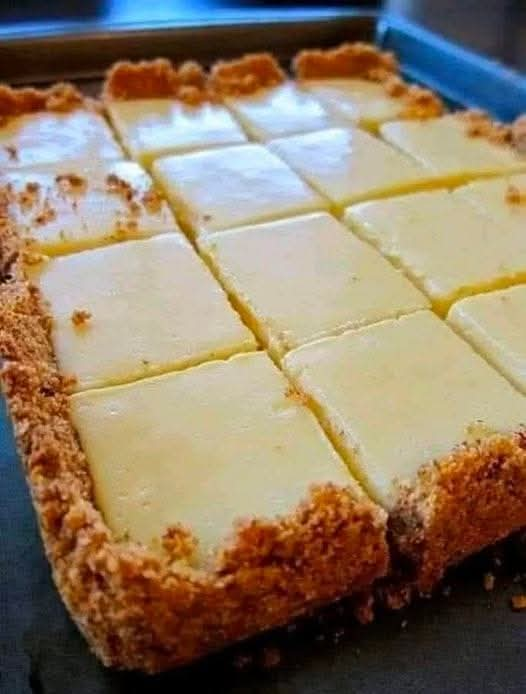
These easy, no-bake Creamy Lemon Squares are the perfect tangy, sweet summer dessert! A buttery graham cracker crust topped with a smooth, luscious lemon filling—ready in 20 minutes of prep. The ultimate make-ahead, crowd-pleasing treat for potlucks, parties, or a sunny day.
Is there anything more joyful than the bright, sunshiny flavor of lemon in a dessert? It’s a taste that sings of summer, cutting through the richness with a perfect, puckery tang. But sometimes, you want that burst of citrus without the commitment of baking a curd or turning on the oven. Enter the Creamy Lemon Square: a dessert that is all reward, no effort. Imagine a thick, buttery, sweet graham cracker crust that crumbles with every bite, giving way to a layer of silky-smooth, intensely lemony filling that’s rich yet refreshing, tart yet sweet. It’s like the best part of lemon meringue pie and cheesecake had a beautiful, no-fuss baby.
This recipe is the answer to your last-minute dessert dilemmas, your potluck panic, and your craving for something that feels both indulgent and bright. With just 20 minutes of active prep and a handful of simple ingredients, you can create a dessert that looks stunning in a glass dish and promises clean plates every time. It’s incredibly family-friendly, a guaranteed crowd-pleaser, and so easy that it feels like a secret. Let’s make a dessert that tastes like sunshine.
Why You’ll Love This No-Bake Lemon Square Recipe
Before we zest our lemons, let’s talk about why this recipe is a non-negotiable for your dessert rotation:
· Truly No-Bake & No-Cook: The filling sets in the fridge, not the oven. It’s the ultimate easy, heat-free summer dessert.
· 20-Minute Active Prep: The “work” is simply mixing and pouring. The refrigerator does the magic.
· Perfect Make-Ahead Dessert: It requires chilling time, which means you can make it a day (or two!) in advance for completely stress-free entertaining.
· Brilliant Textural Contrast: The crunchy, crumbly crust against the velvety, creamy filling is absolutely irresistible.
· The Perfect Balance: These squares masterfully walk the line between tangy and sweet, satisfying citrus lovers and dessert fans alike.
Ingredients for the Perfect Tangy & Sweet Squares
Simple, quality ingredients are key. Fresh lemon juice makes all the difference.
For the Graham Cracker Crust:
· 24 full-sheet graham crackers (about 2 cups / 200g of fine crumbs)
· ¼ cup (50g) granulated sugar
· ½ cup (1 stick / 113g) unsalted butter, melted
· Pinch of salt
For the Luscious Lemon Filling:
· 2 (8 oz) blocks full-fat cream cheese, softened to room temperature
· 1 cup (120g) powdered sugar, sifted
· 2 tablespoons fresh lemon zest (from about 2-3 lemons)
· ⅓ cup (80ml) fresh lemon juice (from about 2-3 lemons)
· 1 teaspoon pure vanilla extract
· 1 (8 oz) tub frozen whipped topping (like Cool Whip®), thawed
· Optional: Yellow food coloring for a vibrant hue
For Garnish & Serving:
· Additional whipped topping or fresh whipped cream
· Thin lemon slices or twists
· Extra graham cracker crumbs or zest
Pro-Tip Ingredient Notes:
· Cream Cheese: Use the full-fat, brick-style cream cheese. Low-fat or whipped varieties will make the filling runny. Softening to room temperature is critical for a lump-free, silky filling.
· Fresh Lemons: Do not use bottled lemon juice. The bright, true flavor of fresh lemons is the star here. Zest your lemons before juicing them!
· Whipped Topping: This stabilizes the filling and makes it wonderfully light. For a from-scratch version, whip 1 ½ cups of heavy cream with 3 tbsp powdered sugar until stiff peaks form.
Step-by-Step Instructions: Building Your No-Bake Masterpiece
The process is simple: crust, filling, chill. Follow this order for perfect layers.
Step 1: Make the Buttery Graham Cracker Crust
In a food processor, pulse the graham crackers until you have fine, even crumbs. You should have about 2 cups.
In a medium bowl, combine the graham cracker crumbs, sugar, and a pinch of salt. Pour the melted butter over the mixture and stir until it resembles wet sand and holds together when pinched.
Pour the mixture into an ungreased 8×8 or 9×9 inch square baking dish. Use the bottom of a measuring cup or glass to press it down firmly and evenly into one solid layer. Press it up the sides about ½ inch to form a slight rim.
Place the crust in the freezer for 15 minutes to set while you make the filling.
Step 2: Create the Smooth, Zesty Lemon Filling
In a large bowl, beat the softened cream cheese with an electric mixer on medium speed for 1-2 minutes until completely smooth and creamy. Scrape down the bowl.
Add the sifted powdered sugar, lemon zest, lemon juice, and vanilla extract. Beat on medium until fully combined and smooth, scraping the bowl as needed.
Taste for balance! This is your chance to adjust. Want more tang? Add a teaspoon more lemon juice. More sweetness? A bit more powdered sugar.
Switch to a spatula. Gently fold in the thawed whipped topping in two additions until no white streaks remain. Be gentle to keep the mixture fluffy and light. Add a drop of yellow food coloring now if using.
Step 3: Assemble and Chill to Set
Remove the crust from the freezer. Pour the creamy lemon filling over the crust.
Use an offset spatula to spread the filling into an even, smooth layer, reaching into the corners.
Cover the dish tightly with plastic wrap. Refrigerate for at least 6 hours, but ideally overnight (12 hours). This is the magic step where the filling sets firmly enough to slice into clean squares. Do not rush this.
Step 4: Garnish, Slice, and Serve
Just before serving, garnish with dollops of whipped topping, lemon slices, or a sprinkle of zest.
For the cleanest slices, dip a sharp knife in hot water and wipe it dry before each cut. Slice into 9 or 12 squares.
Serve cold, and enjoy the perfect balance of sweet, crunchy crust and tangy, creamy filling!
Expert Tips for Flawless Lemon Squares
· Press the Crust Firmly: A well-packed crust won’t crumble when you slice into it. The bottom of a flat measuring cup is the perfect tool.
· Room Temperature Cream Cheese: This is the #1 rule for a smooth filling. Cold cream cheese will leave lumps no matter how long you mix.
· Gently Fold: When incorporating the whipped topping, use a folding motion with a spatula. Vigorous mixing will deflate the air and make the filling dense.
· Chill Time is Non-Negotiable: Patience is key. The squares need the full time to set up properly for serving.
· Zest First, Juice Second: Always zest your lemons onto a cutting board before you cut and juice them. It’s infinitely easier.
Delicious Variations to Try
· Lemon Blueberry Swirl: Swirl ¼ cup of blueberry jam into the filling before chilling.
· Coconut Lemon Squares: Add ½ cup of toasted sweetened coconut to the crust, and sprinkle more on top.
· Meyer Lemon Squares: Use sweeter, less acidic Meyer lemons for a more delicate, floral flavor.
· Individual Servings: Layer the crust and filling in small mason jars or dessert cups.
· Ginger Snap Crust: Use crushed ginger snap cookies instead of graham crackers for a spiced twist.
Frequently Asked Questions (FAQ)
Can I use a different citrus fruit?
Absolutely!Lime juice and zest make fantastic Key Lime Squares. You could also use a mix of lemon and orange.
How far in advance can I make these?
They are perfect for making 1-2 days ahead.The flavor improves, and they hold their structure beautifully. Keep them covered in the refrigerator.
How long do they last in the fridge?
Covered tightly,they will stay fresh for 3-4 days.
Can I freeze Creamy Lemon Squares?
It’s not recommended.The texture of the dairy and the filling can become watery and grainy upon thawing.
My filling is runny. What happened?
This is almost always due to cream cheese that wasn’t fully softened or overmixing when adding the whipped component.Ensure your cream cheese is very soft, and fold gently. You can also try chilling the filling for 20 minutes before assembling if your kitchen is very warm.
These Creamy Lemon Squares are more than just a no-bake dessert; they are a burst of sunshine on a plate. They capture the vibrant, cheerful essence of lemon in a form that’s effortlessly elegant and universally loved. This recipe proves that impressive results don’t require complicated methods—just a little patience while the fridge works its magic.
So, embrace the ease. Whip up a batch for your next gathering, and get ready for the recipe requests. This is the simple, stunning dessert that will become your warm-weather secret weapon.
Now, I’d love to see your creation! Did you add a berry swirl or try a different crust? Share your photos and your family’s reactions in the comments below!
Love easy, tangy no-bake desserts? You have to try my No-Bake Key Lime Pie or my Strawberry Cream Cheese Icebox Cake next!
More Recipes You Might Like
-

Crock Pot Chicken And Noodles Belongs
The Ultimate Comfort: Why 4-Ingredient Crock Pot Chicken And Noodles Belongs in Your Weekly Rotation There is a specific, almost…
-

Carrot Cake Roll with Cream Cheese Frosting
The Swirl of Perfection: Why Carrot Cake Roll with Cream Cheese Frosting Is the Dessert That Steals the Show There…
-

LOADED CHEESY POCKET TACOS
The Handheld Fiesta: Why Loaded Cheesy Pocket Tacos Are the Dinner Revolution You Need There is a specific, almost primal…