
Learn how to make perfectly smooth, creamy custard every time with this foolproof guide! Includes easy stovetop pouring custard and baked custard cup recipes. Simple ingredients, step-by-step tips for a classic, comforting dessert or sauce.
Creamy custard is the quiet hero of the dessert world—a testament to the alchemy that occurs when just a few humble ingredients (eggs, milk, sugar) are combined with care and gentle heat. When done right, it’s a dessert of pure elegance: silky-smooth, luxuriously rich, and profoundly comforting. Yet, the mere mention of making custard can strike fear into the heart of a home cook. Visions of curdled eggs, watery texture, or a skin-covered surface loom large. But what if you could master it with confidence?
This guide is your key to unlocking that confidence. We’ll demystify the process, providing two foundational recipes: a versatile stovetop pouring custard (crème anglaise) for draping over pies and berries, and a set baked custard for enjoying in cups. You’ll learn the science behind the silky texture, the crucial technique of tempering, and the simple secrets to a flawless finish every single time.
Whether you dream of a warm bowl of custard on a chilly evening, need a luscious base for ice cream, or want to master a fundamental building block of pastry, this guide is for you. Let’s create something simple, sublime, and effortlessly creamy.
Why Mastering Custard is a Culinary Right of Passage
Before we crack our eggs, let’s appreciate why this skill is so valuable:
· A Fundamental Technique: Custard is the base for ice cream, crème brûlée, quiche, bread pudding, and flan. Master this, and you unlock a world of desserts.
· The Epitome of Comfort Food: Warm or cold, it’s a simple, nourishing, and nostalgic treat that soothes the soul.
· Minimal Ingredients, Maximum Reward: With just eggs, dairy, and sugar, you can create a dessert that feels both humble and luxurious.
· Teaches Precision & Patience: Making custard cultivates a cook’s most important skills: attention, temperature control, and gentle handling.
Recipe 1: Perfect Stovetop Pouring Custard (Crème Anglaise)
This is a pourable sauce, perfect for pouring over fruit, cake, or bread pudding.
Ingredients:
· 2 cups (480ml) whole milk or half-and-half
· 4 large egg yolks
· ⅓ cup (67g) granulated sugar
· Pinch of salt
· 1 teaspoon pure vanilla extract (or seeds from ½ vanilla bean)
Step-by-Step Instructions:
Heat the Milk: In a medium saucepan, heat the milk (and vanilla bean seeds/pod, if using) over medium heat until it just begins to steam and tiny bubbles form around the edges (scalding). Do not boil. Remove from heat.
Whisk Yolks & Sugar: In a separate medium bowl, whisk the egg yolks, sugar, and salt together vigorously until the mixture is pale, thick, and falls from the whisk in a smooth ribbon (about 2 minutes).
Temper the Eggs (The Crucial Step): While whisking the egg yolk mixture constantly, very slowly drizzle in about ½ cup of the hot milk. This gradually raises the temperature of the eggs without cooking them.
Combine & Cook: Pour the tempered egg mixture back into the saucepan with the remaining milk. Cook over low heat, stirring constantly and slowly with a wooden spoon or spatula. Do not stop stirring. Scrape the bottom and sides.
Watch for “Nappé”: Cook until the custard thickens enough to coat the back of the spoon. When you run your finger through it, the path should hold cleanly. This is the “nappé” stage (about 170-175°F / 76-80°C). Do not let it simmer or boil.
Strain & Chill: Immediately remove from heat and pour through a fine-mesh strainer into a clean bowl to catch any curdled bits. Stir in the vanilla extract (if not using a bean). Press plastic wrap directly onto the surface to prevent a skin. Chill for at least 2 hours. It will thicken further as it cools.
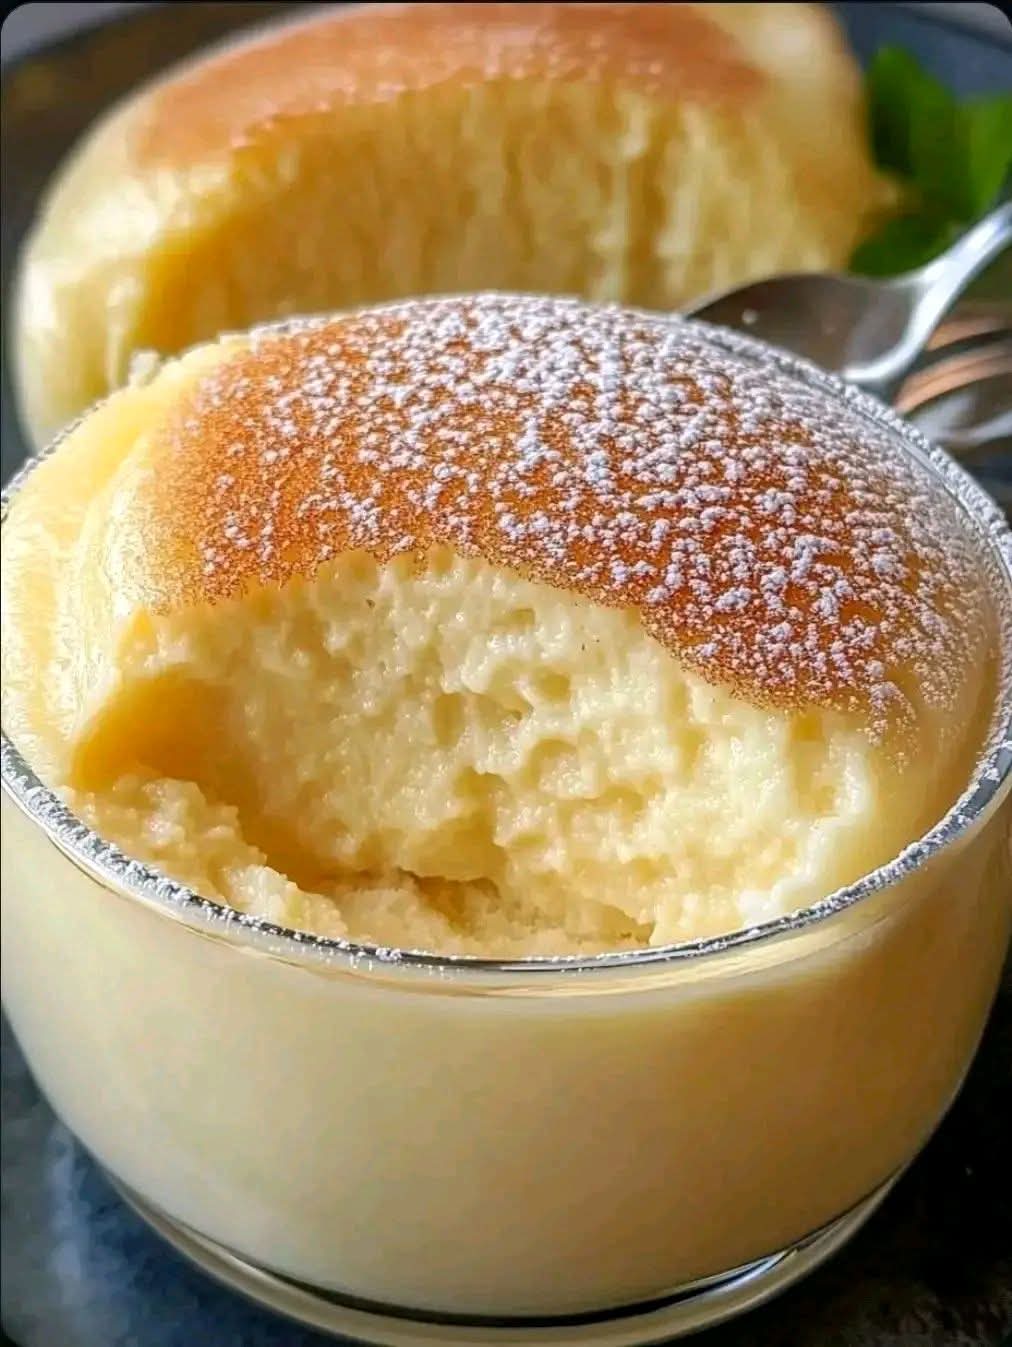
Recipe 2: Simple Baked Custard Cups
This is a set, spoonable custard, baked gently in a water bath.
Ingredients:
· 2 cups (480ml) whole milk or heavy cream (for richer)
· 3 large eggs + 1 extra yolk
· ⅓ cup (67g) granulated sugar
· 1 tsp pure vanilla extract
· Pinch of salt
· Freshly grated nutmeg (optional)
Step-by-Step Instructions:
Preheat & Prep: Preheat oven to 325°F (160°C). Place 4-6 ramekins in a deep baking dish.
Scald Milk: Heat milk until just steaming (as in Recipe 1).
Whisk Eggs & Sugar: Whisk eggs, extra yolk, sugar, vanilla, and salt until smooth and combined, but not frothy.
Temper & Combine: Slowly whisk the hot milk into the egg mixture.
Strain & Pour: Strain the mixture into a pouring jug, then divide evenly among ramekins. Sprinkle with nutmeg.
Create a Water Bath: Place the baking dish in the oven. Then, pour hot water into the outer dish until it comes halfway up the sides of the ramekins.
Bake Low & Slow: Bake for 35-45 minutes, until the edges are set but the center still has a slight, gentle wobble (like Jell-O) when you shake the pan.
Cool & Chill: Remove ramekins from water bath. Cool to room temp, then refrigerate for at least 4 hours before serving.
The Golden Rules for Perfect Custard (For Both Methods)
Temper, Don’t Scramble: Always slowly introduce hot liquid to the eggs while whisking vigorously. Never dump hot milk into cold eggs.
Low and Slow Heat: Custard proteins set gently between 160-180°F (71-82°C). High heat causes them to clump violently (curdling).
Constant, Gentle Stirring: This ensures even heat distribution and prevents hot spots on the bottom of the pan.
Strain Without Fail: Straining guarantees a perfectly silky texture by removing any accidental bits of cooked egg.
The Water Bath (for baking): This bain-marie is non-negotiable. It creates a gentle, steamy environment for even cooking without cracking or rubberiness.
Expert Flavor Variations & Tips
· Infuse the Milk: Steep the warming milk with citrus zest, a cinnamon stick, a split vanilla bean, or a tablespoon of loose tea for 15 minutes before straining and proceeding.
· Chocolate Custard: Whisk 4 oz of finely chopped dark chocolate into the hot, finished stovetop custard until melted and smooth.
· Coffee Custard: Dissolve 1 tbsp of instant espresso powder into the milk before heating.
· Coconut Custard: Substitute 1 cup of the milk with full-fat canned coconut milk.
· For a Richer Custard: Use half milk, half heavy cream, or add an extra egg yolk.
· Preventing a Skin: Press plastic wrap directly onto the surface of the cooling custard.
Troubleshooting: Common Custard Problems & Fixes
Problem: My custard is curdled/lumpy.
Cause & Fix:The heat was too high or it boiled. For stovetop, immediately strain it and blend with an immersion blender if needed. For baked, it’s likely overcooked—use a lower temp and shorter time next time.
Problem: My custard is watery/weeping.
Cause & Fix:This is “syneresis.” Often caused by overcooking (the proteins squeeze out water) or undercooking (the structure never fully sets). Ensure proper cooking temperature and time.
Problem: Baked custard has a bubbly, spongy texture.
Cause & Fix:The custard mixture was whisked too vigorously, creating air bubbles. Whisk gently just to combine. Also, ensure your water bath is not simmering.
Problem: Custard won’t thicken on the stove.
Cause & Fix:It may not have gotten hot enough. Use a thermometer and cook to 170-175°F. If it’s still thin, you can create a cornstarch slurry (1 tsp cornstarch + 1 tbsp cold milk) and whisk it into the cooking custard, then heat for 1 more minute.
Mastering creamy custard is a quiet victory in the kitchen. It’s a skill that speaks of care and understanding, resulting in a dessert that is at once simple and deeply sophisticated. With this guide, you have the knowledge to move from fear to freedom, creating a classic that will never go out of style.
Now, take a deep breath, grab your whisk, and embrace the gentle art of custard. The reward is pure, silky, creamy perfection.
Have you conquered custard? What’s your favorite way to flavor it? Share your triumphs and questions in the comments below!
Ready for the next challenge? Use your custard skills to make Classic Crème Brûlée or Homemade Vanilla Ice Cream!
More Recipes You Might Like
-

Crock Pot Chicken And Noodles Belongs
The Ultimate Comfort: Why 4-Ingredient Crock Pot Chicken And Noodles Belongs in Your Weekly Rotation There is a specific, almost…
-

Carrot Cake Roll with Cream Cheese Frosting
The Swirl of Perfection: Why Carrot Cake Roll with Cream Cheese Frosting Is the Dessert That Steals the Show There…
-

LOADED CHEESY POCKET TACOS
The Handheld Fiesta: Why Loaded Cheesy Pocket Tacos Are the Dinner Revolution You Need There is a specific, almost primal…