
Bake professional-quality Dutch Oven Crusty Bread at home with this easy, no-knead recipe! Just 4 ingredients, one bowl, and zero skill required for a crackling crust, chewy interior, and incredible flavor. The perfect beginner’s artisan bread!
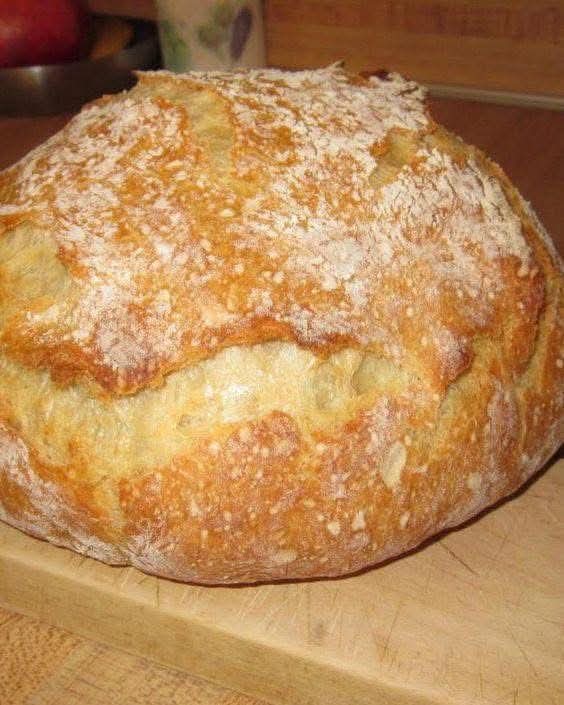
There is a certain alchemy that happens when flour, water, salt, and yeast are given time, then meet the intense, trapped steam of a preheated Dutch oven. The result is nothing short of magical: a loaf of bread with a crackling, shattering, golden-brown crust that gives way to a soft, airy, and chewy interior laced with irregular, beautiful holes. This is Dutch Oven Crusty Bread, and for years, it was a secret held by professional bakers. Now, with the revolutionary no-knead method, it’s a secret any home cook can unlock with shocking ease.
This recipe is a masterpiece of simplicity and patience over skill. Forget about complicated folding techniques, precise kneading, or special equipment. This method requires just one bowl, four pantry staples, and about 5 minutes of hands-on work. The magic lies in a very long, slow rise (autolyse) that allows the gluten to develop on its own and flavor to deepen exponentially. The sealed environment of the Dutch oven mimics a professional baker’s steam-injected oven, creating that iconic, blistered crust we all crave.
Whether you’re a baking novice intimidated by yeast, a busy person craving real bread without the fuss, or a seasoned cook wanting to achieve bakery-level results, this recipe is your gateway. It’s unfailingly impressive, deeply satisfying, and proves that the best things in life—and in baking—are often the simplest. Let’s bake the loaf that will make you feel like a true artisan.
Why This No-Knead Dutch Oven Bread is Revolutionary
Before we mix our flour, let’s appreciate why this method has changed home baking forever:
· True No-Knead Simplicity: Mix the ingredients and walk away. Time develops the gluten for you. Zero technical skill required.
· Professional-Quality Results: The Dutch oven traps the bread’s own steam, creating an unbeatable, crackly crust and an open, chewy crumb that rivals any bakery.
· Incredible Flavor Development: The 12-18 hour slow ferment allows complex, slightly tangy flavors to develop, similar to a sourdough starter.
· Only 4 Ingredients: Flour, water, salt, yeast. That’s it. No sugar, no oil, no additives.
· Make-One, Bake-Another Flexibility: The dough can rest in the fridge for up to 3 days, allowing you to bake fresh bread on demand.
Ingredients: The Magnificent Four
The purity of this bread comes from its minimal ingredient list. Quality matters.
· 3 cups (360g) bread flour (All-purpose flour works, but bread flour yields a chewier, more robust crumb with better oven spring)
· 1 ½ cups (360ml) warm water (about 100°F / 38°C)
· 2 teaspoons kosher salt (or 1 ¼ teaspoons fine sea salt)
· ¾ teaspoon instant yeast (or 1 teaspoon active dry yeast)
Pro-Tip Ingredient Notes:
· Flour: Bread flour is highly recommended for its higher protein content (12-13%), which creates more gluten and a better, chewier structure.
· Yeast: Instant yeast can be mixed directly with the dry ingredients. If using active dry yeast, dissolve it in the warm water first and let it sit for 5 minutes until foamy.
· Water: Warm water kickstarts the yeast. It should feel like warm bath water, not hot.
· Salt: Use kosher salt for its pure flavor. If using fine table salt, reduce the quantity by about 25%.
Step-by-Step Instructions: Patience is Your Secret Ingredient
The timeline is long, but your active involvement is incredibly short.
Step 1: The Long Mix (5 Minutes of Work)
In a large mixing bowl, whisk together the flour, salt, and instant yeast.
Add the warm water. Using a wooden spoon or your hands, mix until a shaggy, sticky, and rough dough forms and there are no dry patches of flour. This will take less than a minute. It will be messy and sticky—this is correct!
Cover the bowl tightly with plastic wrap or a damp kitchen towel.
Step 2: The Long, Slow Rise (12-18 Hours)
Let the dough rest at room temperature (about 70°F/21°C) for 12 to 18 hours. The dough is ready when it’s dotted with bubbles, has more than doubled in size, and has a slightly domed, bubbly surface.
Step 3: Shape & Second Rise (30 Minutes + 2 Hours)
Prep: Lay a large piece of parchment paper on your counter. Heavily flour the top of the parchment and your hands.
Shape: Using floured hands or a dough scraper, gently scrape the risen, wet dough out of the bowl onto the floured parchment. Without kneading, gently fold the edges of the dough into the center 4-8 times to form a rough, seam-side-down ball. Use the parchment to help you if needed.
Using the parchment as a sling, lift the dough and place it, parchment and all, into a clean bowl or proofing basket. Cover loosely with the plastic wrap or towel.
Let it rise again for 1 ½ to 2 hours, until it looks puffy and has increased in size by about 50%.
Step 4: Preheat & Bake (The Magic Moment)
About 30 minutes before the second rise is complete, place your empty Dutch oven (with its lid on) into your oven. Preheat to 450°F (230°C). The pot must be screaming hot.
When the dough is ready, carefully remove the hot Dutch oven from the oven. Remove the lid.
Using the parchment sling, carefully lower the dough ball into the center of the hot pot. The parchment paper goes in with it.
Optional: Using a very sharp knife, lame, or razor blade, make one swift, confident slash (½-inch deep) across the top of the dough. This controls expansion and looks professional.
Immediately cover with the hot lid and return to the oven.
Step 5: Bake for the Perfect Crust
Bake with the lid ON for 30 minutes. This creates the critical steam environment.
After 30 minutes, carefully remove the lid. The bread will be pale and have risen dramatically.
Continue baking, uncovered, for another 15-20 minutes, until the crust is a deep, glorious, golden brown.
For the ultimate test, the internal temperature should read 205-210°F (96-99°C).
Step 6: The Crucial Cool
Transfer the loaf (using the parchment sling) to a wire cooling rack. Remove the parchment.
Resist all temptation! You must let the bread cool completely (at least 1 hour) before slicing. Slicing hot bread releases steam and turns the beautiful, airy crumb gummy.
Expert Tips for Bakery-Perfect Bread Every Time
· Don’t Skimp on Rise Time: The long, slow first rise (12-18 hours) is non-negotiable for flavor and texture. A warmer room will speed it up; a cooler one will slow it down.
· A Wet Dough is a Good Dough: The dough should be very sticky and slack. Adding extra flour during shaping will make the bread dense.
· Preheat Thoroughly: Give your oven and Dutch oven a full 30 minutes to preheat. This ensures a powerful “oven spring” (the final burst of rising).
· Use Parchment for Safety & Ease: The parchment sling is the safest, easiest way to transfer the wet dough into the scorching-hot pot.
· Listen to Your Bread: As it cools, you’ll hear the crust crackle and sing—the sweet sound of success.
Delicious Variations to Try
· Whole Wheat: Substitute 1 cup of bread flour with whole wheat flour.
· Seeded Loaf: During the initial mix, add ¼ cup each of sunflower seeds, pumpkin seeds, and flax seeds.
· Rosemary & Sea Salt: Fold 2 tbsp of chopped fresh rosemary into the dough during shaping. Before baking, brush with water and sprinkle with flaky sea salt.
· Garlic & Herb: Add 1 tsp garlic powder and 2 tsp of dried Italian herbs to the dry ingredients.
· Cheese & Black Pepper: Fold in 1 cup of grated sharp cheddar and 1 tsp coarsely ground black pepper.
Frequently Asked Questions (FAQ)
Can I use all-purpose flour?
Yes,it will work and still be delicious, but the crumb will be slightly less chewy and open, and the crust may not be as robust.
My dough didn’t rise much. What happened?
Likely causes:Old/expired yeast, water that was too hot (which killed the yeast), or a room that was too cold. Ensure your yeast is fresh and your room is comfortably warm.
Do I need a specific Dutch oven?
Any oven-safe pot with a tight-fitting lid will work:enameled cast iron (like Le Creuset or Lodge), bare cast iron, or even a heavy stainless steel pot. A 4 to 6-quart size is ideal.
Can I refrigerate the dough to bake later?
Absolutely!After the initial 12-18 hour rise, you can punch it down, cover tightly, and refrigerate for up to 3 days. Let it come to room temperature and complete its second rise (this may take 3-4 hours) before baking.
How do I store the bread?
Store at room temperature in a paper bag or loosely wrapped in a tea towel for up to 2 days for the best crust.For longer storage, keep in a plastic bag once fully cool; the crust will soften but the flavor remains. It freezes beautifully for up to 3 months.
Baking Dutch Oven Crusty Bread is more than following a recipe; it’s a lesson in trust. Trust in four simple ingredients. Trust in the power of time. And trust that with minimal effort, you can pull a loaf from your own oven that looks, smells, and tastes like it came from the hearth of the world’s best bakery.
It is the ultimate beginner’s masterpiece—a profound and delicious reward for your patience. So, mix your dough tonight, and wake up to the promise of the most incredible bread you’ve ever made.
Now, I’d love to hear from you! Was this your first no-knead loaf? How did your crust turn out? Share your baking triumphs and photos in the comments below!
Ready for your next bread challenge? Try my No-Knead Focaccia or Soft Pretzel Bites recipe next
More Recipes You Might Like
-

Crock Pot Chicken And Noodles Belongs
The Ultimate Comfort: Why 4-Ingredient Crock Pot Chicken And Noodles Belongs in Your Weekly Rotation There is a specific, almost…
-

Carrot Cake Roll with Cream Cheese Frosting
The Swirl of Perfection: Why Carrot Cake Roll with Cream Cheese Frosting Is the Dessert That Steals the Show There…
-

LOADED CHEESY POCKET TACOS
The Handheld Fiesta: Why Loaded Cheesy Pocket Tacos Are the Dinner Revolution You Need There is a specific, almost primal…