
There is nothing—absolutely nothing—that compares to the simple, profound pleasure of slicing into a loaf of freshly baked homemade sandwich bread. The crisp, golden crust giving way to a cloud-soft, tender crumb. The aroma of yeast and toasted wheat filling your kitchen. The knowledge that you created this perfect, versatile staple with your own hands. This isn’t just bread; it’s the foundation of countless meals, from morning toast to epic sandwiches, and the heart of comforting family dinners.
While store-bought loaves are convenient, they simply cannot compete with the flavor, texture, and satisfaction of the real thing. This foolproof white bread recipe demystifies the process, breaking it down into simple, manageable steps. Whether you’re a beginner bread baker taking your first leap into yeast doughs or a seasoned cook looking for a reliable, everyday loaf, this recipe is your blueprint for success. Let’s bake the bread that will transform your kitchen into a bakery and become a cherished weekly ritual.
Why Homemade Bread Beats Store-Bought Every Time
· Unmatched Flavor & Texture: No preservatives, dough conditioners, or artificial flavors. Just the pure, sweet, wheaty taste of real bread with a crust that crackles and an interior that stays soft for days.
· Complete Control: You control the ingredients—use organic flour, local honey, or sea salt. Make it exactly to your taste.
· Cost-Effective: A homemade loaf costs a fraction of a premium artisanal bakery loaf.
· Therapeutic Process: The rhythmic kneading, the quiet rise, the transformative bake—it’s a mindful, rewarding practice.
· Versatile Foundation: This dough can become dinner rolls, cinnamon swirl bread, or garlic knots. Master this, and a world of baking opens up.
Ingredient Science: The Simple Elements of a Perfect Loaf
Understanding the role of each component is the first step to bread-baking confidence.
Flour: Bread flour is ideal for sandwich bread. Its higher protein content (12-14%) creates more gluten, resulting in a stronger, taller loaf with a chewier crumb. All-purpose flour works well too, yielding a slightly more tender bread.
Liquid: Whole milk creates the richest flavor and softest crumb. Water makes a crustier, chewier loaf. A combination is perfect for balance. The liquid must be warm (105°F-115°F / 40°C-46°C) to properly activate the yeast without killing it.
Yeast: Instant yeast (also called rapid-rise or bread machine yeast) is the most convenient. It can be mixed directly with the dry ingredients. If using active dry yeast, you must “proof” it in the warm liquid with a pinch of sugar first.
Fat: Unsalted butter (or oil) tenderizes the gluten, giving the bread a softer texture and longer shelf life. It also enriches the flavor.
Sweetener: Sugar or honey feeds the yeast, promotes browning, and adds a subtle sweetness that enhances the overall flavor.
Salt: Essential for flavor. It also tightens the gluten structure, giving the loaf better shape and texture. Never skip it.
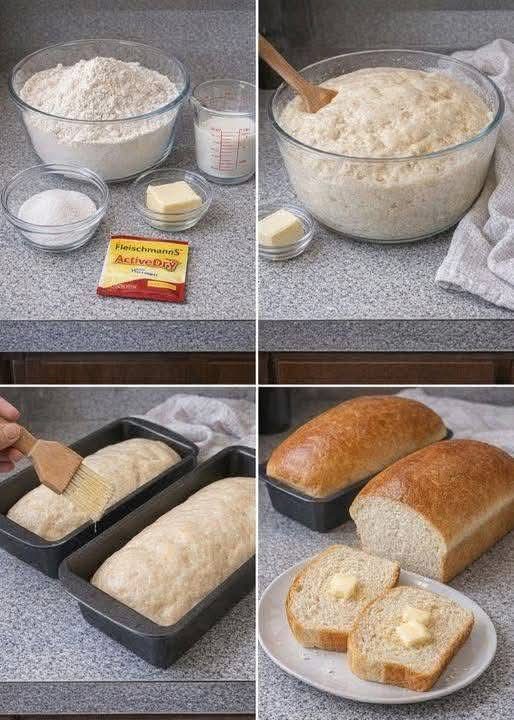
Classic Homemade Sandwich Bread Recipe
Prep Time: 25 mins | Rise Time: 1.5 – 2 hours | Bake Time: 30-35 mins | Total Time: 3 hours | Yield: 1 beautiful 9×5-inch loaf
Ingredients:
· 1 cup (240ml) whole milk, warmed
· ⅓ cup (80ml) water, warmed
· 3 tablespoons (43g) unsalted butter, melted + extra for brushing
· 2 tablespoons (25g) granulated sugar or honey
· 2 ¼ teaspoons (1 standard packet / 7g) instant yeast
· 3 ½ to 4 cups (438g-500g) bread flour or all-purpose flour, divided
· 1 ½ teaspoons (9g) fine sea salt
Equipment:
· Stand mixer with dough hook (recommended) or large mixing bowl
· 9×5-inch loaf pan
· Kitchen scale (for best results)
· Instant-read thermometer
· Plastic wrap or a clean kitchen towel
Step-by-Step Instructions:
Combine Wet Ingredients & Yeast:
In the bowl of a stand mixer,whisk together the warm milk, warm water, melted butter, sugar/honey, and instant yeast. Let sit for 5 minutes until slightly frothy.
Mix the Dough:
Add 3 ½ cups(438g) of the flour and the salt. Attach the dough hook and mix on low speed until a shaggy dough forms, about 2 minutes. Increase speed to medium and knead for 6-8 minutes. The dough should clear the sides of the bowl but may stick slightly to the bottom. If it’s excessively sticky, add the remaining flour 1 tablespoon at a time until it pulls away.
Knead to Perfection (By Hand Option):
If kneading by hand,turn the shaggy dough onto a lightly floured surface. Knead for 10-12 minutes, using the heel of your hand to push the dough away, then fold it back over itself. Add minimal flour as needed. The dough is ready when it’s smooth, elastic, and passes the “windowpane test”: stretch a small piece; it should thin enough to see light through without tearing immediately.
First Rise (Bulk Fermentation):
Shape the dough into a smooth ball.Place it in a lightly greased bowl, turning once to coat. Cover with plastic wrap or a damp towel. Let rise in a warm, draft-free place until doubled in size, about 1-1.5 hours. (A turned-off oven with the light on is perfect).
Shape the Loaf:
Punch down the risen dough to release air bubbles.Turn it out onto a lightly floured surface. Flatten into an 8×10-inch rectangle. Tightly roll the dough into a log, starting from a short end. Pinch the seam and ends to seal. Place the loaf, seam-side down, into a greased 9×5-inch loaf pan.
Second Rise (Proofing):
Cover the pan loosely with plastic wrap or a towel.Let rise until the dough crowns about 1-1.5 inches above the rim of the pan, about 45-60 minutes. Preheat your oven to 375°F (190°C) during the last 20 minutes of rising.
Bake to Golden Perfection:
Bake the loaf on the center rack for 30-35 minutes,until the crust is deep golden brown and the loaf sounds hollow when tapped on the bottom (internal temperature should reach 190°F / 88°C).
Cool Completely (The Hardest Step!):
Immediately remove the bread from the pan and place it on a wire rack.Brush the top with a little melted butter for a soft, glossy crust. Let the bread cool completely (at least 2 hours) before slicing. This prevents a gummy interior.
Pro-Tips for Bread-Baking Success
· Use a Scale: Measuring flour by weight (grams) is the single best way to ensure consistency. Cup measurements can vary wildly.
· The Windowpane Test is Your Best Friend: This is the most reliable way to know gluten is properly developed. Don’t skip this check.
· Don’t Rush the Rise: Yeast works at its own pace. The time is a guideline. The dough is ready when it’s doubled in size, not when the timer goes off.
· Sharp Blade for Slashing: If you want to slash the top of your loaf before baking (for a professional look), use a razor blade or very sharp knife.
· Cooling is Part of Baking: The bread continues to cook and set its structure as it cools. Slicing too early is the #1 mistake.
Troubleshooting Common Bread Issues
· Dense, Heavy Loaf: Under-kneaded, yeast was dead/killed by too-hot liquid, or dough didn’t rise long enough.
· Bread Collapsed in Oven: Over-proofed (the dough rose too much before baking, exhausting the yeast’s strength).
· Pale Crust: Oven temperature too low, or not baked long enough.
· Tough Crust: Not enough steam in the initial bake. Place a pan of ice cubes on the bottom oven rack when you put the bread in.
· Gummy Texture: Sliced while still warm, or under-baked.
Storage & Freezing Instructions
· Room Temperature: Store the completely cooled loaf in a bread bag or wrapped in foil at room temperature for 3-4 days.
· Freezing for Longevity: This bread freezes superbly. Wrap the whole cooled loaf or individual slices tightly in plastic wrap, then place in a freezer bag. Freeze for up to 3 months. Thaw at room temperature or toast from frozen.
· Reviving Stale Bread: A quick toast or a 10-second microwave burst can revive day-old bread. For a whole stale loaf, run it briefly under water and warm in a 350°F oven for 10 minutes.
Frequently Asked Questions (FAQ)
Q: Can I make this dough in a bread machine?
A: Absolutely.Add the liquid ingredients first, then dry ingredients (salt and yeast on opposite sides), and use the “Dough” cycle. Remove, shape, do the second rise in the pan, and bake as directed.
Q: My kitchen is cold. How can I help the dough rise?
A:Create a warm proofing box: place the covered bowl in an unheated oven with a large pan of boiling water on the rack below it. The steam and ambient warmth are perfect.
Q: Can I use all whole wheat flour?
A:You can, but the loaf will be denser. For a lighter whole wheat loaf, substitute 50% of the bread flour with whole wheat flour and add 1-2 extra tablespoons of liquid.
Q: Why is my bread crumbly?
A:Too much flour was likely incorporated during kneading or shaping. Next time, use a lighter touch and rely more on the windowpane test than adding flour.
Conclusion: The Foundation of Your Kitchen
Mastering this classic homemade sandwich bread is a culinary milestone. It’s a skill that nourishes both body and soul, connects you to a timeless tradition, and fills your home with the world’s most comforting smell. This loaf is more than food; it’s a gesture of care, a blank canvas for creativity, and the simple, profound joy of creating something real.
So, dust off your apron, trust the process, and take pride in that first perfect slice. You’ve just baked bread.
Now, we’d love to see your beautiful loaf! Did you make a family sandwich with it? Share your photos and stories. And for more foundational baking recipes like bagels, pizza dough, and sourdough starters, be sure to explore the blog.
More Recipes You Might Like
-

Crock Pot Chicken And Noodles Belongs
The Ultimate Comfort: Why 4-Ingredient Crock Pot Chicken And Noodles Belongs in Your Weekly Rotation There is a specific, almost…
-

Carrot Cake Roll with Cream Cheese Frosting
The Swirl of Perfection: Why Carrot Cake Roll with Cream Cheese Frosting Is the Dessert That Steals the Show There…
-

LOADED CHEESY POCKET TACOS
The Handheld Fiesta: Why Loaded Cheesy Pocket Tacos Are the Dinner Revolution You Need There is a specific, almost primal…