
The Slice of Pure Magic: Why Chocolate Cherry Pie Deserves a Standing Ovation
There is a specific, almost transcendent moment that occurs when you cut into a perfect pie. The knife glides through layers of silky filling, meets the resistance of a buttery crust, and emerges with a perfect wedge that holds its shape on the spatula. You lift it onto a plate, and for a moment, everyone at the table stops talking. They are waiting. They are watching. They are about to experience something special.
Chocolate cherry pie is that something special.
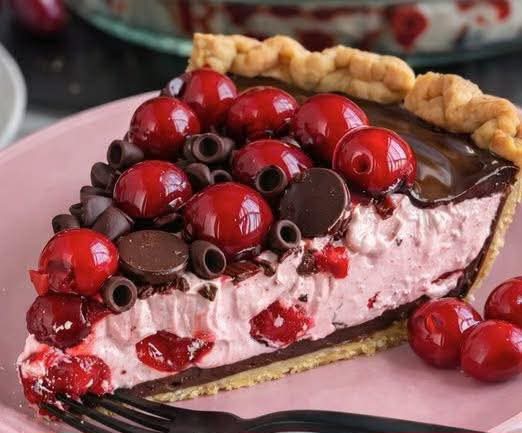
It is a dessert of glorious contradictions. The deep, bitter richness of dark chocolate against the bright, tangy sweetness of cherries. The silky smoothness of cream cheese against the slight chew of fruit. The crisp, chocolatey crust against the luscious, no-bake filling. It is a study in contrasts, a symphony of flavors and textures that somehow come together in perfect harmony.
And here is the best part: it requires no baking. No tempering. No complicated techniques. Just a few ingredients, a little patience, and the willingness to create something beautiful. It is the kind of dessert that looks like you spent hours in the kitchen, when really you spent twenty minutes assembling and let the refrigerator do the rest.
If you are searching for easy no-bake pies that look like they came from a fancy bakery, or if you need chocolate cherry desserts that will earn you requests for the recipe, this pie is your answer. It is the proof that the most magical desserts are often the simplest. It is the slice of pure magic you deserve.
The History of Chocolate and Cherry
The combination of chocolate and cherry is one of the great pairings in dessert history. It appears in Black Forest cake, in cherry cordials, in chocolate-covered cherries, in countless ice creams and confections. The two flavors complement each other perfectly—the deep, almost bitter notes of chocolate balanced by the bright, sweet-tart pop of cherries.
This particular pie draws inspiration from several traditions. The cream cheese layer is pure American no-bake pie, the kind that has appeared at church suppers and family gatherings for generations. The chocolate crust adds richness and depth. The cherry topping provides color, flavor, and that unmistakable pop of fruit.
Together, they create something new. Something magical. Something that will have people asking for the recipe before they finish their first slice.
The Anatomy of Perfect Chocolate Cherry Pie
Great chocolate cherry pie has four essential components.
The Crust: A chocolate pie crust provides the foundation. It can be homemade or store-bought, but it must be chocolate. The cocoa flavor is essential to the overall harmony.
The Cream Cheese Layer: Rich, tangy, and sweet, this layer provides a creamy counterpoint to the fruit and chocolate. It is the canvas upon which the other flavors are painted.
The Cherry Layer: Sweet, tart, and jewel-toned, the cherry topping is the star. Use quality cherry pie filling for ease, or make your own for extra credit.
The Chocolate Garnish: A drizzle of melted chocolate, chocolate shavings, or chocolate curls adds the finishing touch. It is not optional; it is the crown.
The Ultimate Chocolate Cherry Pie Recipe
Yield: 8 servings
Ingredients:
For the Crust:
· 1 (9-inch) chocolate pie crust (store-bought or homemade)
For the Cream Cheese Layer:
· 8 oz cream cheese, softened
· 1 cup powdered sugar
· 1 teaspoon vanilla extract
· 1 cup heavy whipping cream
For the Cherry Layer:
· 1 can (21 oz) cherry pie filling
· 1 teaspoon almond extract (optional)
For the Chocolate Garnish:
· 2 oz semi-sweet or dark chocolate
· 1 teaspoon coconut oil or shortening (optional)
Instructions:
Phase One: Prepare the Cream Cheese Layer
Soften Cream Cheese: Ensure the cream cheese is fully softened to room temperature. This is essential for a smooth, lump-free filling.
Beat Cream Cheese: In a large bowl, beat the softened cream cheese with an electric mixer until smooth and creamy.
Add Powdered Sugar: Gradually add the powdered sugar, beating until smooth and well combined. Scrape down the sides of the bowl as needed.
Add Vanilla: Beat in the vanilla extract.
Phase Two: Whip the Cream
Chill Bowl and Beat ers: For best results, chill your mixing bowl and beaters in the refrigerator for 15 minutes before whipping cream.
Whip to Stiff Peaks: Pour the heavy cream into the chilled bowl. Beat on medium-high speed until stiff peaks form—the cream should hold its shape firmly when the beaters are lifted.
Fold into Cream Cheese: Gently fold the whipped cream into the cream cheese mixture until no white streaks remain. Be gentle; you want to maintain as much air as possible.
Phase Three: Assemble the Pie
Fill the Crust: Spoon the cream cheese mixture into the chocolate pie crust. Spread evenly with a spatula.
Chill: Refrigerate for at least 2 hours, until the filling is firm.
Phase Four: Add the Cherry Layer
Prepare Cherry Filling: In a small bowl, stir the cherry pie filling with the almond extract if using. The almond extract enhances the cherry flavor beautifully.
Top the Pie: Gently spoon the cherry pie filling over the set cream cheese layer, spreading evenly. Return the pie to the refrigerator while you prepare the chocolate garnish.
Phase Five: Chocolate Garnish
Melt Chocolate: Chop the chocolate finely and place in a microwave-safe bowl. Microwave in 20-second intervals at 50% power, stirring between each interval, until melted and smooth. If using, stir in the coconut oil for a smoother drizzle.
Drizzle: Drizzle the melted chocolate over the cherry layer in a decorative pattern. You can use a spoon, a fork, or a piping bag with a small tip.
Chill: Refrigerate for at least 1 more hour to set the chocolate.
Phase Six: Serve
Slice: Use a sharp knife dipped in hot water and wiped dry between cuts for clean slices.
Serve: Place each slice on a dessert plate. Garnish with additional chocolate shavings or fresh cherries if desired.
Enjoy: Watch your guests close their eyes and savor each bite.
The Crust Question
The crust is the foundation. Here are your options.
Store-Bought Chocolate Pie Crust: The ultimate shortcut. Keebler makes a good one, and many grocery stores carry their own brands. Look in the baking aisle.
Homemade Chocolate Crust: If you want to make your own, combine 1½ cups chocolate cookie crumbs (like Oreos, crushed with filling), ¼ cup melted butter, and 2 tablespoons sugar. Press into a 9-inch pie plate and bake at 350°F for 10 minutes. Cool completely before filling.
Oreo Crust: Using Oreos (filling included) creates an extra-chocolatey, slightly sweeter crust. This is a wonderful option.
Gluten-Free: Many store-bought chocolate crusts are gluten-free. Check labels. You can also make your own using gluten-free chocolate cookies.
The Cream Cheese Temperature
Cream cheese must be softened for a smooth filling. Here is why.
Room Temperature: At least 1 hour on the counter. It should yield to gentle pressure.
Quick Soften: Microwave at 50% power in 10-second intervals until softened but not melted.
Cold Cream Cheese: Will not blend smoothly. You will have lumps in your filling.
The Whipped Cream Essential
Homemade whipped cream is essential. Here is why.
Texture: Whipped cream from a carton is stabilized and will not fold as smoothly. It also lacks the fresh, pure flavor of homemade.
Stiff Peaks: Whip until stiff peaks form—the cream should hold its shape firmly. This ensures the filling sets properly.
Sweetness: The cream is unsweetened, allowing the powdered sugar in the cream cheese to provide all the sweetness. This balance is perfect.
The Cherry Pie Filling
Canned cherry pie filling is the convenient choice. Here is what to know.
Quality: Look for a brand with real cherries, not just cherry-flavored goo. The difference is noticeable.
Almond Extract: A tiny amount of almond extract enhances the cherry flavor remarkably. It is the secret ingredient in many cherry desserts.
Homemade Option: If you want to make your own, combine 2 cups pitted fresh or frozen cherries, ½ cup sugar, 2 tablespoons cornstarch, and 1 tablespoon lemon juice in a saucepan. Cook over medium heat until thickened. Cool completely before using.
Tart vs. Sweet: Cherry pie filling is typically sweet. If you want more tartness, use a “tart cherry” variety or add a squeeze of lemon.
The Chocolate Garnish
The chocolate drizzle is the finishing touch. Here is how to make it beautiful.
Melted Chocolate: Use good-quality chocolate. Semi-sweet or dark balances the sweetness of the pie perfectly.
Coconut Oil: Adding a teaspoon of coconut oil or shortening makes the chocolate thinner and gives it a beautiful shine.
Drizzling Technique: Use a spoon to drizzle back and forth, or transfer the chocolate to a small zip-top bag, snip a tiny corner, and pipe.
Chocolate Shavings: For extra elegance, top the drizzle with chocolate shavings made by running a vegetable peeler along the edge of a chocolate bar.
The Flavor Universe: Endless Variations
The classic is perfect. But variations are endless.
Black Forest Pie:
Add a layer of chocolate ganache between the cream cheese and cherry layers. Use dark chocolate for the drizzle. This is Black Forest cake in pie form.
Chocolate Raspberry Pie:
Substitute raspberry pie filling for cherry. The raspberry-chocolate combination is equally divine.
Chocolate Strawberry Pie:
Use strawberry pie filling. Garnish with fresh strawberry slices.
Mocha Chocolate Cherry Pie:
Add 1 tablespoon instant espresso powder to the cream cheese mixture. The coffee enhances the chocolate flavor.
White Chocolate Cherry Pie:
Use white chocolate for the drizzle and garnish with white chocolate shavings. This is a beautiful variation.
Nutty Chocolate Cherry Pie:
Add ½ cup toasted, chopped almonds or pecans to the cream cheese layer. The nuts add crunch.
Boozy Chocolate Cherry Pie:
Add 1 tablespoon cherry liqueur or bourbon to the cherry pie filling. This is the adult version.
The Make-Ahead Advantage
This pie is designed for make-ahead convenience.
Same Day: Make it in the morning, serve it that evening. The chilling time is sufficient.
Day Before: Ideal. The flavors meld, the texture sets perfectly.
Two Days Ahead: Still excellent. The crust may soften slightly but the pie will still be delicious.
Do Not Freeze: This pie does not freeze well. The cream cheese layer can become watery upon thawing.
The Serving Question
How to serve this pie? Here are elegant options.
Chilled: Straight from the refrigerator. The filling is firm, the flavors are clean.
Slightly Tempered: Let sit at room temperature for 10-15 minutes before serving. The cream cheese layer softens slightly.
With Whipped Cream: A dollop of lightly sweetened whipped cream is never wrong.
With Ice Cream: Vanilla ice cream is the perfect accompaniment.
With Coffee: A slice of this pie with a cup of dark roast coffee is pure bliss.
The Garnish Gallery
Make it beautiful. Here are garnish ideas.
Chocolate Shavings: Use a vegetable peeler on a chocolate bar.
Fresh Cherries: Place a fresh cherry on each slice, with stem attached.
Mint Sprigs: A single mint sprig adds color and freshness.
Whipped Cream: Pipe rosettes of whipped cream around the edge.
Powdered Sugar: A light dusting adds elegance.
The Leftover Strategy
Leftovers are a gift. Here is how to store them.
Refrigerator: Cover loosely with plastic wrap or foil and refrigerate for up to 3 days. The crust may soften but the flavor will remain.
Do Not Freeze: As mentioned, freezing is not recommended.
Leftover Slices: Enjoy straight from the refrigerator or let sit at room temperature for a few minutes.
Troubleshooting: When Pies Go Wrong
The Filling Is Too Soft: You did not whip the cream enough, or you did not chill it long enough. Next time, whip cream to stiff peaks and chill thoroughly.
The Filling Is Too Stiff: You overwhipped the cream. Next time, stop at stiff peaks.
The Crust Is Soggy: You filled it too far in advance, or your cream cheese layer was too warm when added. Next time, ensure the crust is fully cooled and the filling is properly set before adding the cherry layer.
The Layers Separated: You did not let the cream cheese layer set before adding the cherry topping. Next time, chill until firm.
The Chocolate Drizzle Seized: Water or steam got into the chocolate, or you overheated it. Next time, microwave in short bursts and keep everything dry.
The Pie Is Too Sweet: Use dark chocolate and tart cherry pie filling next time. For this batch, serve with unsweetened whipped cream.
The Pie Is Bland: You under-seasoned the cream cheese layer. Next time, add a pinch of salt and ensure vanilla is present.
The Sentimental Pie
My aunt made a cherry pie for every family gathering. Not this pie—hers was a traditional double-crust cherry pie, baked until bubbly, with a lattice top she crimped by hand. She would bring it in a woven basket, still warm, and set it on the counter with a flourish. It was her signature, her gift, her way of saying “I love you” without words.
When she passed away, I inherited her pie plates. Heavy, glass, slightly scratched from decades of use. I thought about all the pies they had held, all the gatherings they had graced, all the love they had carried.
This chocolate cherry pie is not her pie. It is different in almost every way. But when I make it, I think of her. I think of her hands crimping lattice. I think of her smile when someone asked for seconds. I think of how she taught me, without ever giving a formal lesson, that the best gift you can give is something you made yourself.
That is the secret, I think. Not the perfect cream cheese layer or the glossy cherry topping or the elegant chocolate drizzle. The secret is that chocolate cherry pie is never really about the pie. It is about the people you share it with. It is about the gatherings where it appears. It is about the love that passes through food, generation to generation.
It is about feeding people, the way you were fed.
Make this pie for your next gathering. Make it for a holiday, a birthday, a Tuesday. Make it because it is easy and beautiful and everyone loves it. Make it because it tastes like magic.
Make it because people like to eat.
And then sit at the table, cutting that first perfect slice, watching your family’s eyes light up, watching them savor each bite, and know that you have done something ancient and good.
You have taken cream cheese and cherries and chocolate and transformed them into magic. You have created a dessert that will be remembered. You have fed the people in front of you.
That is not just cooking. That is the slice of pure magic. That is the taste of love.
Memorize this recipe. It will never let you down. It will carry you through holidays and gatherings and moments when you need something special.
It is the taste of chocolate and cherries and cream cheese. It is the taste of magic. It is ready whenever you are.
More Recipes You Might Like
-

Crock Pot Chicken And Noodles Belongs
The Ultimate Comfort: Why 4-Ingredient Crock Pot Chicken And Noodles Belongs in Your Weekly Rotation There is a specific, almost…
-

Carrot Cake Roll with Cream Cheese Frosting
The Swirl of Perfection: Why Carrot Cake Roll with Cream Cheese Frosting Is the Dessert That Steals the Show There…
-

LOADED CHEESY POCKET TACOS
The Handheld Fiesta: Why Loaded Cheesy Pocket Tacos Are the Dinner Revolution You Need There is a specific, almost primal…