

Introduction
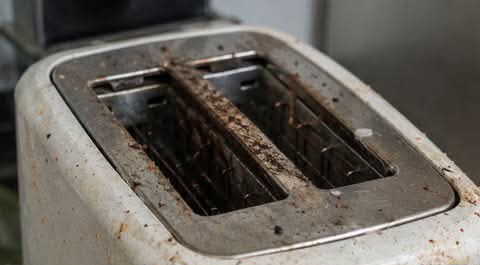
The humble toaster is one of the most frequently used kitchen appliances, yet it is often one of the most neglected when it comes to cleaning. Over time, bread crumbs, grease, dust, and food particles accumulate inside and around the appliance, creating an unsanitary environment. A dirty toaster can affect the taste of your food, produce unpleasant odors, and even become a fire hazard. Fortunately, keeping your toaster clean is simple and requires only a few basic supplies.
Origin
The electric toaster was first introduced in the early 20th century, revolutionizing breakfast preparation by making perfectly browned toast quick and convenient. As toasters became a household staple, maintenance recommendations evolved to emphasize regular cleaning and crumb removal to improve both safety and appliance longevity.
Cultural Significance
Toasters hold a special place in kitchens around the world, symbolizing convenience and modern living. From simple buttered toast to gourmet breakfast creations, this appliance has become an essential part of daily routines. Because it is used so frequently, maintaining a clean toaster contributes not only to food hygiene but also to overall kitchen cleanliness and safety.
Supplies Needed
Cleaning Essentials:
- Mild dish soap
- Warm water
- Soft microfiber cloth
- Small cleaning brush or pastry brush
- Soft toothbrush
- Cotton swabs
- Dry towel
Optional Supplies:
- White vinegar
- Baking soda
- Compressed air canister
- Non-abrasive sponge
Optional Additions
- Use lemon-scented vinegar for a fresh aroma.
- Keep a small brush specifically for cleaning kitchen appliances.
- Place a washable mat under the toaster to catch crumbs.
- Consider using reusable toaster bags for cheesy or messy foods.
Tips for Success
- Always unplug the toaster and allow it to cool completely before cleaning.
- Never immerse the toaster in water.
- Empty the crumb tray regularly to prevent buildup.
- Avoid using metal utensils inside the toaster slots.
- Wipe down the exterior weekly to prevent grease accumulation.
- Deep-clean the toaster every month if used frequently.
Instructions
Step 1: Unplug the Toaster
Disconnect the toaster from the electrical outlet and allow it to cool completely.
Step 2: Remove the Crumb Tray
Take out the crumb tray and discard all crumbs and debris. Wash the tray with warm, soapy water, rinse thoroughly, and let it dry completely.
Step 3: Shake Out Loose Crumbs
Turn the toaster upside down over a trash can or sink and gently shake it to remove any remaining crumbs.
Step 4: Clean the Interior
Using a soft brush or toothbrush, carefully loosen crumbs stuck inside the toaster. A can of compressed air can help remove debris from hard-to-reach areas.
Step 5: Wipe the Exterior
Mix a small amount of dish soap with warm water and dampen a microfiber cloth. Wipe the outside of the toaster, paying special attention to buttons, knobs, and handles.
Step 6: Tackle Stubborn Stains
For greasy spots or sticky residue, use a cloth lightly dampened with a mixture of equal parts water and white vinegar.
Step 7: Reassemble
Once all parts are completely dry, replace the crumb tray and return the toaster to its usual place.
Description
A clean toaster looks better, smells fresher, and works more efficiently. Removing built-up crumbs and residue helps prevent burnt odors and reduces the risk of smoke or overheating. Regular maintenance can also extend the lifespan of the appliance and improve the quality of your toasted foods.
Maintenance Schedule
- Daily: Shake out visible crumbs if needed.
- Weekly: Wipe down the exterior.
- Monthly: Empty and wash the crumb tray and clean the interior.
- Every Few Months: Perform a thorough deep cleaning.
Safety Information
- Never insert knives, forks, or metal tools into the toaster.
- Do not use excessive water when cleaning.
- Ensure all components are completely dry before plugging the toaster back in.
- Replace the toaster if cords are damaged or if the appliance shows signs of malfunction.
Conclusion
Your toaster may be one of the smallest appliances in your kitchen, but it can accumulate surprising amounts of crumbs, grease, and debris over time. A few minutes of regular cleaning can improve food quality, enhance kitchen hygiene, and reduce potential safety risks.
Recommendation
Make toaster cleaning part of your regular kitchen maintenance routine. Setting a monthly reminder to empty the crumb tray and wipe down the appliance can keep it functioning efficiently and looking its best for years to come.
Embracing Healthful Indulgence
A clean kitchen contributes to a healthier and more enjoyable cooking experience. By maintaining your toaster properly, you create a cleaner environment for preparing your favorite breakfasts and snacks. Small habits like routine appliance care can make a significant difference in both food safety and everyday comfort, allowing you to enjoy your meals with greater peace of mind.