
In a world of overly processed, sugar-laden “health” bars, taking control of your snacks is a powerful act of self-care. Homemade High Protein Crunch Bars are more than a convenient bite; they are a customizable, nutrient-dense fuel source designed to power your day, curb unhealthy cravings, and support your fitness and wellness goals. By crafting them yourself, you transform simple, whole ingredients into a bar that rivals any store-bought version in taste—and surpasses it in purity and purpose. This guide will walk you through creating the perfect, crunchy bar, with a special focus on formulations that integrate powerful anti-inflammatory foods and support natural weight loss through satiety and metabolic balance.
Why Your Pantry Holds the Best Protein Bar
The average grocery store protein bar is often a paradox: high in protein but also high in processed sugars, artificial sweeteners, and unrecognizable additives. When you make your own, you gain:
· Complete Ingredient Transparency: You know every single component that fuels your body.
· Macro Control: Tailor the protein, carb, and healthy fat ratios to your specific needs.
· Cost-Efficiency: Homemade bars are significantly cheaper per serving than premium brands.
· Allergen-Friendly: Easily avoid gluten, dairy, or nuts as needed.
· Superfood Infusion: This is where you can intentionally add herbs for inflammation and antioxidant-rich ingredients.
Protein & Satiety: The Cornerstone of Natural Weight Loss
Adequate protein intake is a non-negotiable pillar of natural weight loss and body composition goals. Protein increases feelings of fullness (satiety), reduces cravings, and requires more energy to digest than carbs or fats. By having a delicious, high-protein snack readily available, you’re equipping yourself to avoid energy crashes and make mindful food choices, turning these bars into a strategic tool for your wellness journey.
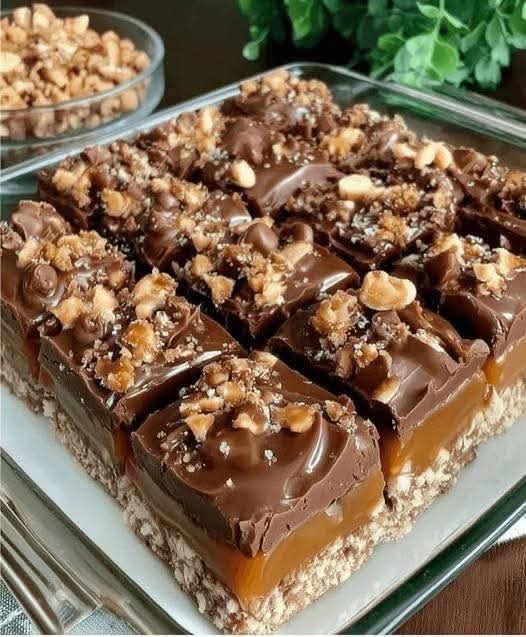
The Classic Chocolate Peanut Butter Crunch Bar
This is your foolproof, crowd-pleasing base recipe. It’s incredibly adaptable and delivers on the classic flavor combo everyone loves.
Prep Time: 15 minutes | Set Time: 1-2 hours | Yield: 10-12 bars
Ingredients:
For the Bar Base:
· 1 ½ cups rolled oats (use gluten-free if needed)
· 1 cup vanilla or chocolate protein powder (whey, pea, or brown rice protein)
· ½ cup natural creamy peanut butter or almond butter
· ⅓ cup pure maple syrup or honey
· ¼ cup unsweetened almond milk or water (more as needed)
· 1 teaspoon vanilla extract
· Pinch of sea salt
For the Crunch & Flavor:
· ½ cup roasted peanuts or almonds, roughly chopped
· ¼ cup pumpkin seeds (pepitas)
· ¼ cup dark chocolate chips
· 2 tablespoons ground flaxseed or chia seeds
Instructions:
Line & Prep: Line an 8×8 inch baking pan with parchment paper, leaving overhang on two sides for easy removal.
Mix Dry Ingredients: In a large bowl, combine the rolled oats, protein powder, chopped nuts, pumpkin seeds, chocolate chips, and ground flaxseed.
Combine Wet Ingredients: In a microwave-safe bowl or small saucepan, gently warm the peanut butter and maple syrup together until just melted and easily stir-able. Remove from heat and stir in the vanilla extract and salt.
Combine & Bind: Pour the wet mixture over the dry ingredients. Stir thoroughly with a spatula or your hands until every dry component is coated. The mixture should be thick and hold together when pressed. If it’s too dry, add almond milk one tablespoon at a time. If too wet, add a bit more protein powder or oats.
Press Firmly: Transfer the mixture to the prepared pan. Use the back of a measuring cup or your hands to press it down very firmly and evenly. This is the key to bars that don’t crumble.
Set: Refrigerate for at least 1-2 hours, or until completely firm.
Slice & Store: Use the parchment overhang to lift the slab out of the pan. Slice into bars or squares. Wrap individually in parchment paper or store in an airtight container in the refrigerator for up to 2 weeks, or freeze for up to 3 months.
Chapter 2: The “Golden” Anti-Inflammatory Crunch Bar
This version is engineered for wellness, packing in ingredients known for their healing properties and support for natural weight loss.
Ingredients:
For the Anti-Inflammatory Base:
· 1 cup rolled oats
· ½ cup vanilla collagen peptides or plain protein powder
· ½ cup almond butter
· ⅓ cup pumpkin puree (adds moisture, fiber, and vitamin A)
· 3 tablespoons pure maple syrup
· 1 tablespoon turmeric powder
· 1 teaspoon ground ginger
· ½ teaspoon cinnamon (a key herb for inflammation that helps regulate blood sugar)
· Freshly cracked black pepper (crucial to activate turmeric’s curcumin)
· Pinch of sea salt
For the Superfood Crunch:
· ½ cup chopped raw pecans or walnuts
· ¼ cup pumpkin seeds
· ¼ cup sunflower seeds
· 2 tablespoons hemp hearts
· 2 tablespoons cacao nibs (for antioxidant crunch without sugar)
Instructions:
Follow the same process as the classic recipe: mix dry, combine wet, bind, press, and chill.
The result is a bar with a vibrant hue and a complex, spiced flavor. The combination of turmeric, ginger, and cinnamon isn’t just for taste; it’s a targeted inclusion of herbs for inflammation that can aid recovery and metabolic health. The healthy fats from nuts and seeds promote satiety, making this bar a powerful ally in a natural weight loss plan.
The Wellness Breakdown:
· Turmeric & Ginger: Potent anti-inflammatory and digestive aids.
· Cinnamon: Helps modulate blood sugar spikes, reducing cravings.
· Pumpkin Puree & Seeds: Rich in magnesium and zinc, supporting immune function and sleep.
· Hemp Hearts: Provide complete plant-based protein and omega-3s.
Pro-Tips for Bar-Making Mastery
· The Press is Paramount: Don’t just pat the mixture down. Lean into it with all your weight to compact the ingredients. This prevents crumbly bars.
· Binding Science: If you need a stronger bind (especially with plant-based proteins), add 1 tablespoon of melted coconut oil to the wet mixture or a tablespoon of chia seeds mixed with 3 tablespoons of water (a chia “egg”).
· Customize Your Crunch: Swap seeds and nuts based on preference. Sliced almonds, chopped cashews, or even toasted coconut work beautifully.
· Sweetness Adjustment: Taste the mixture before pressing. If your protein powder is very sweet, you can reduce the maple syrup. If it’s unflavored, you may need a touch more.
· For a True “Snack Bar” Texture: Bake the pressed mixture in a preheated oven at 325°F (160°C) for 15-18 minutes. Let it cool completely before slicing. This creates a firmer, granola-bar-like texture.
Integrating Bars into a Mindful Wellness Routine
These bars are a tool, not a treat. Here’s how to use them strategically:
The Pre- or Post-Workout Fuel: The balance of protein and complex carbs makes them ideal for exercise nutrition. Have one 30-60 minutes before a workout or as part of your recovery afterward.
The Mid-Afternoon Savior: Pair half a bar with a piece of fruit or a cup of green tea to combat the 3 PM slump without resorting to vending machine options.
Balanced Breakfast Side: Have one alongside a green smoothie for a quick, portable breakfast that keeps you full for hours.
Mindful Portioning: Even though they’re healthy, they are calorie-dense. Slice them into appropriate serving sizes. Savor one slowly with a glass of water or herbal tea for inflammation like ginger or turmeric tea.
Conclusion: Empowerment in Every Bar
High Protein Crunch Bars are a tangible expression of taking your health and nutrition into your own hands. They prove that functional food can be delicious, and that supporting goals like natural weight loss doesn’t mean sacrificing flavor or convenience. By mastering the basic formula, you unlock infinite possibilities for customization.
Remember, a sustainable, healthy lifestyle is built on preparation and smart choices. By stocking your fridge with these homemade bars, you’re investing in your future energy, resilience, and well-being. You’re choosing to fuel your body with anti-inflammatory foods and quality ingredients that actively work for you, not against you.
So, grab your mixing bowl, choose your crunchy additions, and press your way to a smarter snack. Your journey to sustained energy, mindful satisfaction, and holistic wellness is baked—or, in this case, no-baked—right into this simple, powerful recipe.
More Recipes You Might Like
-

BBQ Ribs
Introduction BBQ ribs are one of the most iconic and flavorful dishes in barbecue cuisine, celebrated for their tender meat, smoky aroma, and rich sauce. Slow-cooked until juicy and fall-off-the-bone tender, BBQ ribs are a favorite at cookouts, family gatherings, festivals, and backyard celebrations. Their irresistible combination of smoky spices, savory meat, and sweet tangy…
-

Creamy Paprika Chicken with Zucchini & Rice
Creamy Paprika Chicken with Zucchini & Rice Introduction Creamy Paprika Chicken with Zucchini & Rice is a comforting and flavorful dish that combines tender chicken, aromatic paprika, creamy sauce, fresh zucchini, and fluffy rice into one satisfying meal. This recipe balances richness with freshness, making it ideal for weeknight dinners, family meals, or cozy gatherings.…
-
Crockpot Creamy Mushroom Beef
Crockpot Creamy Mushroom Beef Introduction Crockpot Creamy Mushroom Beef is a hearty and comforting slow-cooked dish featuring tender beef simmered in a rich, creamy mushroom sauce. Known for its deep savory flavor and melt-in-your-mouth texture, this meal is ideal for busy families, cozy dinners, and comforting weekend meals. The slow cooker allows the ingredients to…