
This is the only easy Chocolate Pound Cake recipe you’ll ever need! Discover the secrets to a perfectly moist, rich, and decadent cake with a crunchy crust and velvety crumb. Simple, one-bowl instructions, make-ahead tips, and gluten-free options for the ultimate comfort food dessert.
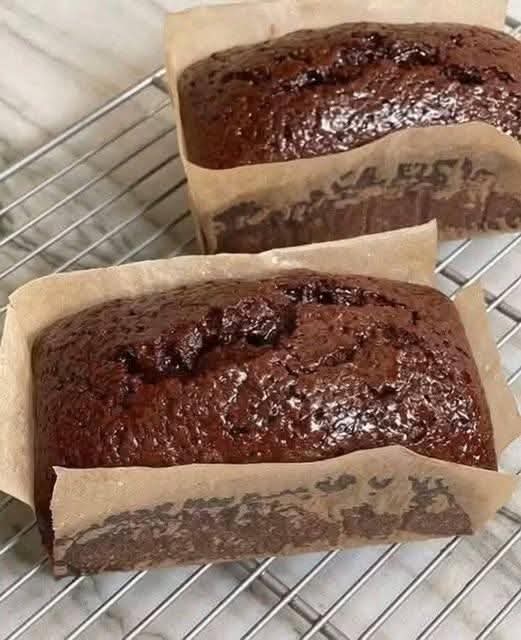
There’s a cake that whispers of home, of celebrations big and small, of comfort found in a simple slice with a glass of cold milk. It’s the cake that sits proudly under a glass dome on the counter, promising something special. That cake is the classic pound cake—but not just any pound cake. This is its richer, more indulgent, deeply beloved cousin: Chocolate Pound Cake.
Forget dry, bland loaves. We’re talking about a cake of profound elegance and simplicity. A cake with a dense, velvety, and impossibly moist crumb that melts on your tongue, a deep, fudgy chocolate flavor that doesn’t rely on fussy frostings, and a signature crackly, crunchy crust that gives way to pure tenderness inside. This isn’t just a dessert; it’s a timeless comfort food, a crowd-pleasing masterpiece, and your new secret weapon for everything from easy weeknight treats to impressive holiday desserts.
The beauty of this Chocolate Pound Cake lies in its glorious duality. It feels both humble and luxurious. It’s shockingly simple to make—often a straightforward, one-bowl recipe—yet the result tastes like it came from a professional bakery. It’s the perfect make-ahead dessert that actually gets better after a day, making it ideal for meal prep and stress-free entertaining. Whether you’re a beginner baker looking for a foolproof success or a seasoned pro seeking the definitive version, this recipe is your destination. Let’s bake a cake that will make memories.
Why This Recipe is the Best Chocolate Pound Cake You’ll Ever Bake
Before we gather our ingredients, let’s talk about what sets this pound cake apart from all others:
· Unbeatable Texture: The precise ratio of butter, sugar, eggs, and flour creates the perfectly dense yet tender pound cake crumb that’s moist for days.
· Deep, Complex Chocolate Flavor: We’re using a double chocolate hit—both cocoa powder and melted chocolate—for a richness that’s intense but not overly sweet.
· The Famous Crunchy Crust: The high sugar and fat content, baked in a classic loaf pan, creates that irresistible, slightly crisp exterior that contrasts magically with the soft interior.
· Supremely Versatile: Enjoy it plain, dusted with powdered sugar, drizzled with glaze, or topped with berries and whipped cream. It’s a blank canvas for creativity.
· Foolproof & Forgiving: The pound cake method is straightforward. With my pro tips, you’re guaranteed a level, beautiful cake every time.
Ingredients for a Deeply Chocolate, Moist Pound Cake
Using high-quality ingredients here makes a tangible difference. Here’s what you’ll need for this rich, decadent cake:
The Dry Ingredients:
· 1 ¾ cups (220g) all-purpose flour, spooned and leveled
· ¾ cup (75g) unsweetened cocoa powder, sifted (Dutch-process preferred for deeper flavor)
· 1 teaspoon baking powder
· ½ teaspoon baking soda
· 1 teaspoon salt (enhances the chocolate flavor)
The Chocolate Foundation:
· 4 oz (113g) good-quality semi-sweet or bittersweet chocolate, finely chopped
· ½ cup (120ml) boiling water or hot brewed coffee (Coffee intensifies the chocolate taste without adding coffee flavor)
The Creamed Mixture (The Heart of the Pound Cake):
· 1 cup (2 sticks / 226g) unsalted butter, softened to room temperature
· 2 cups (400g) granulated sugar
· 4 large eggs, at room temperature
· 2 teaspoons pure vanilla extract
The Finishing Touch:
· ½ cup (120ml) full-fat sour cream or plain Greek yogurt, at room temperature
Pro-Tip Ingredient Notes:
· Cocoa Powder: Dutch-process cocoa is less acidic and results in a darker, richer-colored cake with a smoother chocolate flavor. Natural cocoa works but will yield a lighter-colored, more tart cake.
· Butter & Eggs at Room Temp: This is NON-NEGOTIABLE for proper emulsification. It ensures a smooth, cohesive batter that bakes up evenly, preventing a dense or curdled texture.
· Sour Cream/Yogurt: This is the secret to ultimate moisture and a slight tang that balances the sweetness. Don’t skip it!
Step-by-Step Instructions for Baking Perfection
Follow these steps carefully for a flawless, bakery-quality pound cake.
Step 1: Prep and Pre-Heating
Preheat your oven to 325°F (165°C). This lower temperature is key for a pound cake—it allows the center to cook through without over-browning the crust.
Generously grease and flour a 10-12 cup Bundt pan or two 9×5 inch loaf pans. For absolute non-stick security, use a baking spray that includes flour.
In a medium bowl, whisk together the flour, sifted cocoa powder, baking powder, baking soda, and salt. Set aside.
Step 2: Bloom the Chocolate
Place the finely chopped chocolate in a heatproof bowl. Pour the boiling water or hot coffee over it.
Let it sit for one minute, then whisk until the chocolate is completely melted and the mixture is smooth. Set aside to cool slightly.
Step 3: Cream the Butter & Sugar (The Most Important Step)
In the bowl of a stand mixer fitted with the paddle attachment (or using a hand mixer), beat the softened butter on medium speed for 1 minute until smooth and creamy.
With the mixer running on medium, gradually add the granulated sugar. Once all added, increase speed to medium-high and beat for a full 4-5 minutes. The mixture should become very pale, fluffy, and almost white. This step incorporates air and is essential for the cake’s structure and crust.
Step 4: Incorporate Eggs and Vanilla
Add the eggs one at a time, beating well (about 45 seconds) after each addition. Scrape down the bowl as needed.
Beat in the vanilla extract. The mixture may look slightly curdled after adding the eggs—this is normal.
Step 5: Combine Dry and Wet Ingredients
With the mixer on low, add the flour mixture in three parts, alternating with the sour cream in two parts, beginning and ending with the flour mixture. Mix just until each addition is incorporated. Do not overmix.
Finally, pour in the slightly cooled chocolate mixture. Mix on low until the batter is uniform, rich, and chocolatey. It will be thick but pourable.
Step 6: Bake Low and Slow
Pour/scrape the batter into your prepared pan(s) and smooth the top.
Bake in the center of the preheated oven.
· For a Bundt pan: 60-75 minutes.
· For loaf pans: 50-60 minutes.
The cake is done when a long toothpick or skewer inserted into the center comes out with just a few moist crumbs attached (not wet batter). The top will be cracked and firm to the touch.
Step 7: The Critical Cool Down
Let the cake cool in the pan set on a wire rack for 25-30 minutes. This allows it to set and contract slightly.
Then, carefully invert it onto the wire rack to cool completely (at least 2 hours) before slicing or glazing. Slicing a warm pound cake will result in a gummy texture.
Step 8: Serve & Glaze (Optional but Glorious)
Once completely cool, dust with powdered sugar, or drizzle with a simple chocolate glaze (melt 4 oz chocolate with ½ cup heavy cream).
Slice with a serrated knife for clean cuts. Serve with fresh berries, a dollop of whipped cream, or a scoop of vanilla ice cream for the ultimate decadent dessert.
Expert Tips & Flawless Variations
· Measure Flour Correctly: The #1 cause of dry cake is too much flour. Always spoon flour into your measuring cup and level it off with a knife.
· Don’t Open the Oven: Resist the urge to open the oven door during the first 45 minutes of baking, as it can cause the cake to fall.
· Room Temperature is Key: I cannot stress this enough. Cold ingredients do not incorporate properly and will lead to a dense cake.
· The Toothpick Test: Look for moist crumbs, not a completely clean toothpick. Overbaking is the enemy of moisture.
Delicious Variations to Try:
· Chocolate Marble Pound Cake: Reserve ⅓ of the plain batter before adding chocolate. Alternate spoonfuls in the pan and swirl with a knife.
· Chocolate Chip Pound Cake: Fold 1 cup of mini chocolate chips into the batter before baking.
· Espresso Chocolate Pound Cake: Use hot espresso and add 1 tablespoon of instant espresso powder to the dry ingredients.
· Gluten-Free: Substitute the all-purpose flour with a 1:1 gluten-free flour blend (like Bob’s Red Mill).
· Sour Cream Swap: Use an equal amount of full-fat plain yogurt or buttermilk.
Frequently Asked Questions (FAQ)
Why did my pound cake crack on top?
Celebrate!A deep crack down the center is the signature of a classic, well-made pound cake. It happens because the crust sets before the interior finishes rising.
Can I make this cake ahead of time?
Absolutely.In fact, it tastes better on day two! Once cooled, wrap it tightly in plastic wrap and store at room temperature for up to 3 days. For longer storage, see below.
How do I store and freeze Chocolate Pound Cake?
· Room Temp: Wrapped, for 3-4 days.
· Refrigerator: Wrapped, for up to 1 week. Let slices come to room temp before serving.
· Freezer: Wrap the cooled, unfrosted cake tightly in plastic wrap, then aluminum foil. Freeze for up to 3 months. Thaw overnight in the refrigerator.
My cake is dense and heavy. What went wrong?
Likely causes:Ingredients were not at room temperature, the butter and sugar were not creamed long enough, the oven was too hot, or the flour was over-measured/over-mixed.
Can I use a different pan?
Yes,but adjust baking times. A 9×13-inch pan will bake in 35-45 minutes. Muffin tins will take 18-22 minutes. Always use the toothpick test.
This Ultimate Chocolate Pound Cake is more than a recipe; it’s a legacy in a loaf pan. It’s the taste of nostalgia and the promise of a simple, profound pleasure. It requires no fancy techniques, just attention to a few key details, and in return, it offers a lifetime of delicious rewards.
It’s the cake you bake for a friend who needs cheering up, for a birthday that calls for something classic, or for a quiet Tuesday night that deserves to feel special. It is, in every sense, the best chocolate pound cake—moist, rich, easy, and endlessly reliable.
Now, I’d love to hear from you! Did you add a swirl, try the espresso version, or perfect your glaze? Share your photos, your twists, and your questions in the comments below. Your baking journey inspires me!
Love classic, easy desserts? You must try my Perfect New York-Style Cheesecake or my Best Ever Fudgy Brownies next!
More Recipes You Might Like
-
Lebkuchen Bars
Lebkuchen Bars Introduction Lebkuchen Bars are a deliciously spiced dessert inspired by traditional German gingerbread. Soft, aromatic, and rich with warm holiday flavors, these bars combine honey, cinnamon, cloves, ginger, and nuts into a tender baked treat that feels both festive and comforting. Often topped with a sweet glaze or chocolate coating, Lebkuchen Bars are…
-

Slow Cooker 4-Ingredient Pork Chops and Stuffing
Slow Cooker 4-Ingredient Pork Chops and Stuffing Introduction Slow Cooker 4-Ingredient Pork Chops and Stuffing is the ultimate comfort food meal for busy families and home cooks seeking simplicity without sacrificing flavor. This hearty dish combines tender pork chops with savory stuffing and creamy sauce, all slowly cooked to perfection in one convenient pot. The…
-

3-Ingredient Baked Onion Chicken: The Easy Comfort Food Dinner Everyone Loves
Introduction When it comes to simple yet satisfying meals, few recipes compete with 3-Ingredient Baked Onion Chicken. This comforting dish combines tender chicken, savory onion flavor, and creamy richness into a hearty dinner that requires minimal effort. Perfect for busy weeknights, family gatherings, or cozy evenings at home, this recipe proves that delicious comfort food…