
Discover Sugar Snails, the easy, homemade pastry that’s like a cross between a cinnamon roll and a buttery sugar bun! This simple, no-fuss recipe yields soft, sweet, swirled treats perfect for breakfast, brunch, or a cozy snack. A family-friendly baking project everyone will love!
Close your eyes and think of the most comforting bakery treat. Not an elaborate cake or a fussy tart, but something humble, buttery, and generously coated in sparkling sugar. For many, that treat is the Sugar Snail—a delightful, swirled pastry that sits proudly in bakery cases, offering a simpler, often superior, alternative to its frosted cousin, the cinnamon roll. Imagine a soft, enriched dough, rolled thin, slathered with soft butter and cinnamon sugar, then coiled into a perfect spiral and baked until golden. The finishing touch? A generous roll in melted butter and a bath of crystallized sugar that creates a sweet, delicate crunch with every bite.
This isn’t just a recipe; it’s a passport to a nostalgic, buttery heaven. Sugar Snails are the unsung heroes of the pastry world: less messy than a donut, less complicated than a danish, and endlessly satisfying. They are the perfect beginner-friendly baking project—a great introduction to yeast doughs—and a guaranteed crowd-pleaser for weekend brunches, holiday mornings, or a simple afternoon treat with coffee.
With a straightforward method and minimal ingredients, you can bring the warmth and sweetness of a professional bakery into your kitchen. Let’s create a batch of these irresistible, homemade pastries that are sure to become a new family favorite.
Why You’ll Fall in Love with Homemade Sugar Snails
Before we proof the yeast, let’s talk about what makes this pastry so special:
· Perfect Introduction to Yeast Baking: The dough is forgiving and the shaping is fun and visual. It’s a fantastic beginner-friendly recipe that builds confidence.
· The Ultimate Texture Combination: A tender, pillowy crumb meets a crisp, sugary exterior in every single bite.
· Customizable & Versatile: The filling is a blank canvas. Stick with classic cinnamon-sugar, or try citrus zest, cocoa, or even a smear of Nutella.
· Make-Ahead Magic: The shaped snails can be refrigerated overnight for a stress-free, fresh-baked breakfast.
· Family Fun: Rolling, spreading, and coiling the dough is a delightful activity to do with kids or loved ones.
Ingredients for Soft, Buttery Snails
Simple, quality ingredients yield the most delicious results.
For the Sweet Dough:
· ½ cup (120ml) whole milk, warmed to about 110°F (43°C)
· 2 ¼ teaspoons (1 standard packet / 7g) instant yeast
· ¼ cup (50g) granulated sugar
· 2 ½ cups (315g) all-purpose flour, plus more for dusting
· ½ teaspoon salt
· 1 large egg, at room temperature
· ¼ cup (½ stick / 57g) unsalted butter, softened
For the Cinnamon-Sugar Filling:
· ½ cup (1 stick / 113g) unsalted butter, very soft (almost melted)
· ⅔ cup (135g) light brown sugar, packed
· 1 ½ tablespoons ground cinnamon
For the Sugar Coating:
· ½ cup (1 stick / 113g) unsalted butter, melted
· 1 ½ cups (300g) granulated sugar (or coarse sugar for extra crunch)
Pro-Tip Ingredient Notes:
· Yeast: Instant yeast is easiest (just mix with dry ingredients). If using active dry yeast, dissolve it in the warm milk with a pinch of sugar and let it foam for 5-10 minutes first.
· Butter Temperature: For the dough, it should be softened. For the filling, it should be very soft to spread easily without tearing the dough.
· Sugar for Coating: Coarse or sanding sugar creates a spectacular, professional-looking crunch, but regular granulated sugar works perfectly.
Step-by-Step Instructions: Creating Your Swirls
Step 1: Make the Dough
Combine Wet Ingredients: In a small bowl or measuring cup, whisk the warm milk, yeast, and sugar. Let it sit for 5 minutes until slightly frothy.
Mix Dough: In the bowl of a stand mixer fitted with the dough hook, combine the flour and salt. Add the yeast mixture and the egg. Mix on low until a shaggy dough forms.
Add Butter: With the mixer running on low, add the ¼ cup of softened butter a few pieces at a time, waiting until each is incorporated before adding the next.
Knead: Increase speed to medium and knead for 6-8 minutes, until the dough is smooth, elastic, and pulls away from the sides of the bowl. It will be slightly tacky but not sticky. (To knead by hand, turn onto a floured surface and knead for 10 minutes).
First Rise: Place the dough in a lightly greased bowl, turning to coat. Cover with plastic wrap or a damp towel and let rise in a warm place for 1-1.5 hours, until doubled in size.
Step 2: Prepare Filling & Assemble
Make Filling: While the dough rises, mix the very soft ½ cup butter, brown sugar, and cinnamon in a bowl until it forms a spreadable paste.
Roll Out Dough: Punch down the risen dough. On a lightly floured surface, roll it out into a large rectangle, about 12×18 inches.
Spread Filling: Using an offset spatula or the back of a spoon, spread the cinnamon-sugar butter evenly over the entire surface of the dough, leaving a ½-inch border along one long edge.
Roll Up: Starting with the long edge opposite the border, tightly roll the dough into a log, pinching the clean edge to seal.
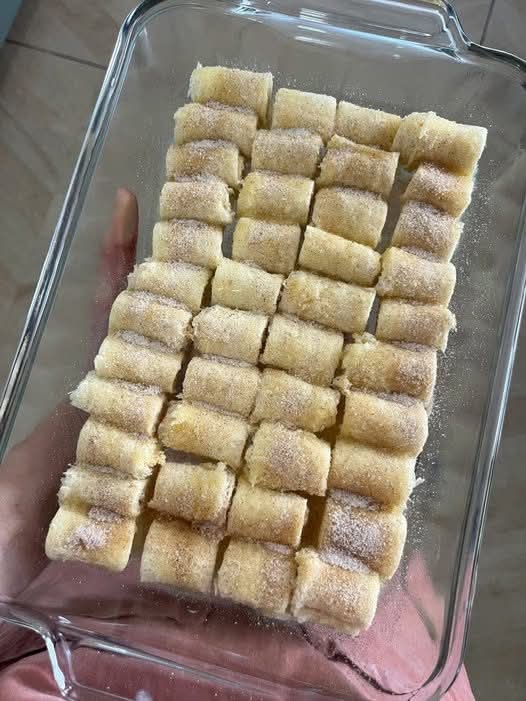
Slice: Using a sharp serrated knife or unflavored dental floss, cut the log into 12 equal pieces (about 1.5 inches thick).
Step 3: Shape, Proof, & Bake
Prepare Pans: Line a baking sheet with parchment paper.
Shape Snails: Take each slice and gently flatten it slightly with the palm of your hand to widen the spiral. Place them on the prepared baking sheet, spaced about 2 inches apart.
Second Rise: Cover loosely with greased plastic wrap and let rise in a warm place for 30-45 minutes, until puffy. Meanwhile, preheat oven to 350°F (175°C).
Bake: Bake for 18-22 minutes, or until the snails are golden brown and the filling is bubbly.
Step 4: The Signature Sugar Coating
Melt Butter & Prep Sugar: While the snails bake, melt the remaining ½ cup of butter in a shallow bowl. Place the 1 ½ cups of sugar in another wide, shallow bowl.
Coat While Warm: As soon as the snails come out of the oven and are cool enough to handle (but still very warm), dip the top and sides of each one first in the melted butter, letting excess drip off, and then roll and press into the sugar to coat thoroughly.
Cool: Place the coated snails on a wire rack to cool completely. The sugar will set into a glorious, crackly shell.
Expert Tips for Bakery-Quality Results
· Don’t Over-Flour: When rolling, use just enough flour to prevent sticking. Too much will make the dough tough and hard to roll tightly.
· Chill for Clean Cuts: If the filled log is too soft to slice neatly, pop it in the freezer for 15-20 minutes to firm up.
· The Dental Floss Trick: For perfectly clean cuts without squashing the rolls, slide a piece of unflavored dental floss under the log, cross the ends over the top, and pull. It slices through cleanly.
· Don’t Overbake: They are done when just golden. Overbaking dries out the dough.
· Coat While Warm: The sugar coating only adheres properly if the pastries are still warm from the oven.
Delicious Variations to Try
· Orange-Cardamom: Add 1 tbsp orange zest and 1 tsp ground cardamom to the filling.
· Apple Pie: Spread a thin layer of apple butter under the cinnamon-sugar filling.
· Chocolate Hazelnut: Replace the cinnamon filling with a generous smear of Nutella.
· Cream Cheese Swirl: Add dollops of sweetened cream cheese over the butter before rolling.
· Glazed Instead of Sugared: Skip the sugar coating and drizzle with a simple vanilla or coffee glaze while warm.
Frequently Asked Questions (FAQ)
Can I make these the night before?
Yes!After shaping the snails on the baking sheet, cover tightly and refrigerate overnight. In the morning, let them sit at room temperature for 1 hour before baking as directed.
How do I store leftover Sugar Snails?
Store in an airtight container at room temperature for up to 2 days.They are best enjoyed fresh but can be gently warmed in the oven to refresh.
Can I freeze them?
Yes,either before or after baking. Freeze unbaked, shaped snails on a tray, then transfer to a bag. Bake from frozen, adding 5-10 minutes to the bake time. Baked snails can be frozen in an airtight container for up to 2 months.
My dough didn’t rise. What went wrong?
Likely causes:yeast was old or expired, the milk was too hot and killed the yeast, or the proofing environment was too cold. Ensure your liquid is warm, not hot, to the touch.
What’s the difference between a Sugar Snail and a Cinnamon Roll?
While similar,Sugar Snails are typically coated in granulated sugar for a crisp, sparkly exterior, while cinnamon rolls are usually topped with a soft, creamy icing or glaze. Snails often have a slightly more rustic, less sweet presentation.
Sugar Snails are more than just a pastry; they are a bite of baking joy. They represent the simple pleasure of creating something beautiful and delicious with your own hands, filling your home with the unmistakable aroma of butter, cinnamon, and warmth. This recipe is your invitation to slow down, enjoy the process, and share a treat that feels like a sweet, sugary hug.
So, gather your ingredients, clear your counter, and get ready to bake a batch of these irresistible, homemade swirls of happiness.
Now, I’d love to see your swirls! Did you try a fun variation? How did your family react? Share your photos and baking stories in the comments below!
Love easy, yeasted breakfast treats? You have to try my One-Hour Cinnamon Rolls or Buttery Swedish Kardemummabullar next
More Recipes You Might Like
-

Meatloaf With A Tomato Beef Sauce
Introduction Meatloaf With A Tomato Beef Sauce is a timeless comfort food dish known for its hearty texture, rich flavor, and satisfying homemade appeal. Combining seasoned ground beef with a savory tomato-based sauce, this classic recipe creates a tender and flavorful centerpiece perfect for family dinners, gatherings, or cozy weekend meals. The balance of juicy…
-
Lebkuchen Bars
Lebkuchen Bars Introduction Lebkuchen Bars are a deliciously spiced dessert inspired by traditional German gingerbread. Soft, aromatic, and rich with warm holiday flavors, these bars combine honey, cinnamon, cloves, ginger, and nuts into a tender baked treat that feels both festive and comforting. Often topped with a sweet glaze or chocolate coating, Lebkuchen Bars are…
-

Slow Cooker 4-Ingredient Pork Chops and Stuffing
Slow Cooker 4-Ingredient Pork Chops and Stuffing Introduction Slow Cooker 4-Ingredient Pork Chops and Stuffing is the ultimate comfort food meal for busy families and home cooks seeking simplicity without sacrificing flavor. This hearty dish combines tender pork chops with savory stuffing and creamy sauce, all slowly cooked to perfection in one convenient pot. The…