
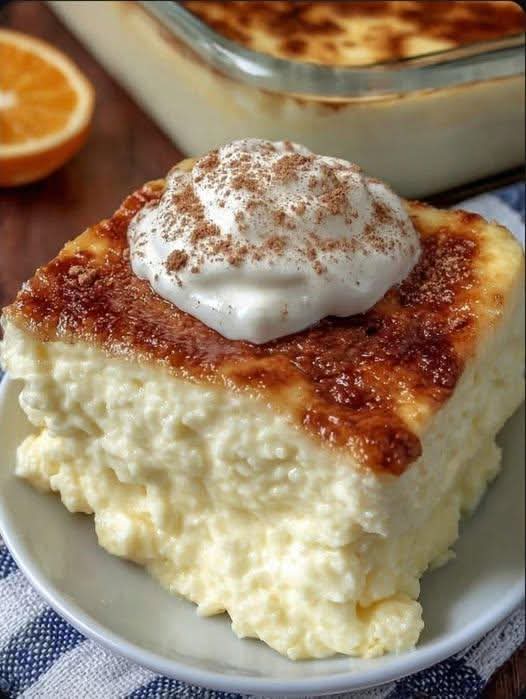
This easy, old-fashioned Amish Baked Custard recipe delivers a creamy, silky, and perfectly sweet dessert with just 5 simple ingredients. Learn the secret to a smooth, crack-free top in this comforting, gluten-free classic that’s perfect for any occasion.
In a world of elaborate desserts and fleeting food trends, there is something profoundly grounding about a recipe that has been passed down through generations, unchanged in its simplicity and unwavering in its comfort. Amish Baked Custard is exactly that—a humble, unassuming dish that speaks to the heart of homestyle cooking. With a short list of pantry staples and a method that requires more patience than skill, this custard transforms everyday milk, eggs, and sugar into a dessert of stunning elegance and quiet luxury.
Imagine a dessert with a texture so silky-smooth it coats your spoon like satin, with a flavor that is pure, sweet, and clean. The top forms a delicate, golden skin, while beneath lies a tender, creamy custard that is both light and richly satisfying. This isn’t the heavy, stovetop pudding of your childhood; this is a baked custard, set gently in the oven in a bath of warm water, resulting in a melt-in-your-mouth consistency that is nothing short of magical.
This recipe is a testament to the Amish principle of simplicity and resourcefulness. It’s a naturally gluten-free dessert, a fantastic way to use up extra eggs, and a soothing, nutritious treat that can be enjoyed warm or cold. Whether you’re seeking a light dessert after a heavy meal, a comforting dish for a loved one, or a beginner-friendly baking project that teaches essential technique, this custard is your answer. Let’s bake a piece of edible history.
Why This Old-Fashioned Custard Recipe is a Timeless Treasure
Before we preheat the oven, let’s appreciate what makes this particular custard so special:
· 5-Ingredient Simplicity: Milk, eggs, sugar, vanilla, and a pinch of salt. That’s it. It’s the ultimate pantry-staple dessert.
· Unmatched Silky Texture: The slow, gentle baking in a water bath (bain-marie) ensures the eggs cook evenly without curdling, creating that signature smooth, creamy consistency.
· A Lesson in Essential Technique: Mastering the water bath method opens the door to crème brûlée, flan, and cheesecake. It’s a fundamental skill for any home baker.
· Comfort Food at its Purest: This custard is warm, soothing, and nostalgic. It’s the edible equivalent of a cozy blanket.
· Incredibly Versatile: Enjoy it plain, with a sprinkle of nutmeg, fresh berries, or a drizzle of caramel. It’s a perfect make-ahead dessert for any season.
Ingredients for a Perfectly Smooth, Sweet Custard
The quality of your few ingredients directly impacts the flavor of this delicate dessert.
· 4 cups (950ml) whole milk (For richest flavor, do not substitute with lower-fat milk)
· 4 large eggs + 2 large egg yolks (The extra yolks add incredible richness and silkiness)
· ⅔ cup (135g) granulated sugar (Adjust to taste; ½ cup for a less sweet custard)
· 2 teaspoons pure vanilla extract
· ¼ teaspoon salt (Enhances all the flavors)
· Freshly grated nutmeg or ground cinnamon, for dusting
Pro-Tip Ingredient Notes:
· Milk: Whole milk is essential for the correct fat content and creamy mouthfeel. For an ultra-rich custard, you can substitute 1 cup of the whole milk with heavy cream.
· Eggs: Use large eggs, and ensure they are at room temperature for easier blending and a smoother final product.
· Sugar: Granulated white sugar is traditional. You can use ½ cup for a less sweet, more egg-forward custard.
· Vanilla: A good quality pure vanilla extract makes all the difference. For a special twist, scrape the seeds from a vanilla bean into the warm milk.
Step-by-Step Instructions: The Secret is in the Bath
The key to success is low, slow, even heat. Follow these steps for a flawless custard.
Step 1: Prep and Preheat
Preheat your oven to 325°F (160°C). This lower temperature is crucial.
Place a deep 9×13 inch baking dish or roasting pan on the center oven rack. This will be your water bath.
Have ready 6-8 (6 oz) ramekins or one deep 9-inch pie dish. Place them on a counter near the stove.
Step 2: Scald the Milk & Mix the Base
In a medium saucepan, heat the milk over medium heat until it is just beginning to steam and form small bubbles around the edges (scalding). Do not boil. Remove from heat.
While the milk heats, in a large bowl, whisk the whole eggs, egg yolks, sugar, vanilla, and salt together until just combined and smooth. Avoid whisking vigorously, which creates too many air bubbles.
Step 3: The Critical Tempering Step
Slowly and gradually, pour the hot milk into the egg mixture in a thin, steady stream, whisking constantly. This gradual process, called tempering, gently raises the temperature of the eggs without cooking them into scrambled bits.
Once all the milk is incorporated, strain the entire mixture through a fine-mesh sieve into a large pouring jug or bowl. This catches any bits of cooked egg or curds, guaranteeing a perfectly smooth custard.
Step 4: Assemble the Water Bath
Divide the strained custard mixture evenly among your ramekins or pour it into the pie dish. Skim off any foam or bubbles from the surface with a spoon for a cleaner top.
Sprinkle the top of each custard lightly with nutmeg or cinnamon.
Carefully place the filled ramekins into the empty baking dish in the oven. Then, using a kettle or jug, pour very hot (near-boiling) water into the outer baking dish until it comes halfway up the sides of the ramekins. This is the water bath (bain-marie).
Step 5: Bake Low & Slow
Bake for 45-55 minutes (for ramekins) or 55-70 minutes (for a pie dish). The custard is done when the edges are set but the center still has a slight, 2-inch wobble (like Jell-O) when you gently shake the pan.
A knife or toothpick inserted near the edge should come out clean; the center will be softer but not liquid.
Step 6: Cool with Care
Immediately and carefully remove the ramekins from the water bath using tongs or a sturdy spatula. Place them on a wire rack to cool to room temperature.
Once at room temperature, cover with plastic wrap and refrigerate for at least 4 hours, or preferably overnight, to fully set and develop flavor.
Step 7: Serve Chilled
Serve cold, straight from the refrigerator. The custard will be firm, creamy, and deeply refreshing.
Expert Tips for a Flawless Custard Every Time
· Temper, Don’t Scramble: The slow addition of hot milk to eggs is the single most important step. Rushing it will cause curdling.
· Strain Without Fail: Straining is your insurance policy for a restaurant-smooth texture.
· The Water Bath is Non-Negotiable: It moderates the oven’s heat, preventing the eggs from overcooking and becoming rubbery or developing a webbed texture.
· The Jiggle Test is Key: Overbaking is the enemy of creamy custard. Remove it when the center is still gently wobbly. Residual heat will continue to cook it as it cools.
· Avoid Air Bubbles: Whisk gently and skim foam to prevent a porous, honeycombed texture.
Delicious Variations to Try
· Maple Custard: Replace ⅓ cup of the granulated sugar with pure maple syrup.
· Brown Sugar & Bourbon: Use light brown sugar and add 1 tablespoon of bourbon with the vanilla.
· Coconut Custard: Substitute 2 cups of the whole milk with full-fat canned coconut milk.
· Orange or Lemon Custard: Add 1 tablespoon of finely grated citrus zest to the milk as it scalds. Strain it out with the zest before tempering.
· Chocolate Custard: Whisk ½ cup of high-quality cocoa powder into the sugar and egg mixture before adding the milk.
Frequently Asked Questions (FAQ)
Why did my custard crack on top?
Cracking is caused by overcooking or too high an oven temperature,which makes the proteins in the eggs contract too violently. Ensure you use a low temperature (325°F) and a water bath, and remove it while the center is still wobbly.
My custard is watery/weeping. What happened?
This”syneresis” occurs when the egg proteins are overcooked and squeeze out moisture. Again, this points to slight overbaking. The water bath helps prevent this.
Can I make this without a water bath?
It is strongly discouraged.The water bath is essential for gentle, even heat. Without it, the edges will cook too quickly, leading to a rubbery texture and likely curdling.
How long does baked custard keep?
Covered tightly with plastic wrap,it will keep in the refrigerator for 3-4 days.
Can I freeze baked custard?
Freezing is not recommended,as it will severely compromise the delicate, creamy texture, making it grainy and watery upon thawing.
Amish Baked Custard is more than a dessert; it is a quiet masterpiece of simplicity. In a few simple steps, it teaches patience, technique, and the profound beauty of transformation. It reminds us that the most satisfying pleasures often come not from complexity, but from honoring the basic, wholesome ingredients right in front of us.
This recipe is an invitation to slow down, to practice care, and to create a moment of pure, gentle sweetness. It’s a gift from the past that remains utterly perfect for the present.
Now, I’d love to hear from you! Did you try a flavored variation? How did your jiggle test turn out? Share your experiences and questions in the comments below.
Love classic, creamy desserts? You should try my Old-Fashioned Rice Pudding or Butterscotch Pots de Crème next!
More Recipes You Might Like
-

Meatloaf With A Tomato Beef Sauce
Introduction Meatloaf With A Tomato Beef Sauce is a timeless comfort food dish known for its hearty texture, rich flavor, and satisfying homemade appeal. Combining seasoned ground beef with a savory tomato-based sauce, this classic recipe creates a tender and flavorful centerpiece perfect for family dinners, gatherings, or cozy weekend meals. The balance of juicy…
-
Lebkuchen Bars
Lebkuchen Bars Introduction Lebkuchen Bars are a deliciously spiced dessert inspired by traditional German gingerbread. Soft, aromatic, and rich with warm holiday flavors, these bars combine honey, cinnamon, cloves, ginger, and nuts into a tender baked treat that feels both festive and comforting. Often topped with a sweet glaze or chocolate coating, Lebkuchen Bars are…
-

Slow Cooker 4-Ingredient Pork Chops and Stuffing
Slow Cooker 4-Ingredient Pork Chops and Stuffing Introduction Slow Cooker 4-Ingredient Pork Chops and Stuffing is the ultimate comfort food meal for busy families and home cooks seeking simplicity without sacrificing flavor. This hearty dish combines tender pork chops with savory stuffing and creamy sauce, all slowly cooked to perfection in one convenient pot. The…